
AWS Lambda and the Serverless Framework is the QUICKEST way to get started in the serverless world!
This guide will teach you how to develop, test, and deploy AWS Lambda functions using Serverless Framework and also get familiar with Identity Access Management (IAM), CloudFormation, S3 Bucket, API Gateway, CloudWatch, and other cool services.
For this demonstration, we'll be using Node.js for its simplicity, low Cold Starts, and huge ecosystem (npm) of tools available to us. We'll learn how to create APIs, enable CORS, run Serverless offline, handle errors, use middlewares, integrate with TypeScript, and set up production continuous deployment and monitoring. You can get the full code on GitHub.
What is Serverless?
Serverless computing is a method of providing backend services on an as-used basis. A Serverless provider allows users to write and deploy code without the hassle of worrying about the underlying infrastructure. As developers, we only care about the code we write, while the servers are scaled and managed by the cloud providers.
The usual setup of Lambda functions in AWS is manual. What Serverless Framework allows us to do is write all of the manual steps as Infrastructure as Code (IaaC) as well as easily manage resources and deploy our functions.
Some characteristics of Lambda functions:
- Servers are managed and provisioned by your cloud provider (hence the name, Serverless)
- No need to pay ahead. You pay per invocation. Plus there are free tiers.
- Small and simple. Great for offloading some pieces of work from your main server (payments, sending emails, compressing images, web scraping, etc.)
- Scale automatically, indefinitely.
- Can easily be integrated with other services such as S3, DynamoDB, Cognito, SQS, etc.
- Invoked with events (HTTP, Sockets, S3, etc.)
- Lambda functions take time to run (warm-up) for the first time usage — this is called a Cold Start.
The beauty of the Serverless Framework is that it is not exclusive to AWS. It supports multiple cloud providers including Azure, GCP, AWS, etc, as well as several languages like Python, Node.js, C#, Java and others.
Prerequisites
Make sure you have an AWS account, AWS-CLI and Node.js installed on your machine. You can verify the latter by running aws --version and node -v in your terminal.
Setting up IAM Role
To kick things off, we need to generate permissions for our Lambda User.
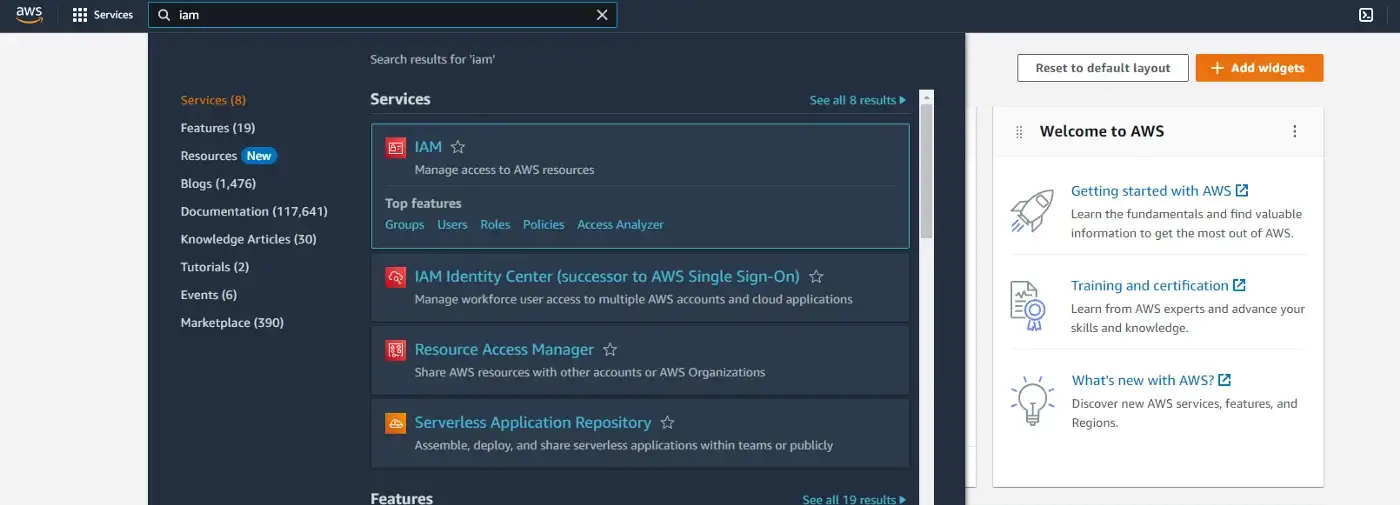
Step 1: Sign in to your AWS account and search for IAM.
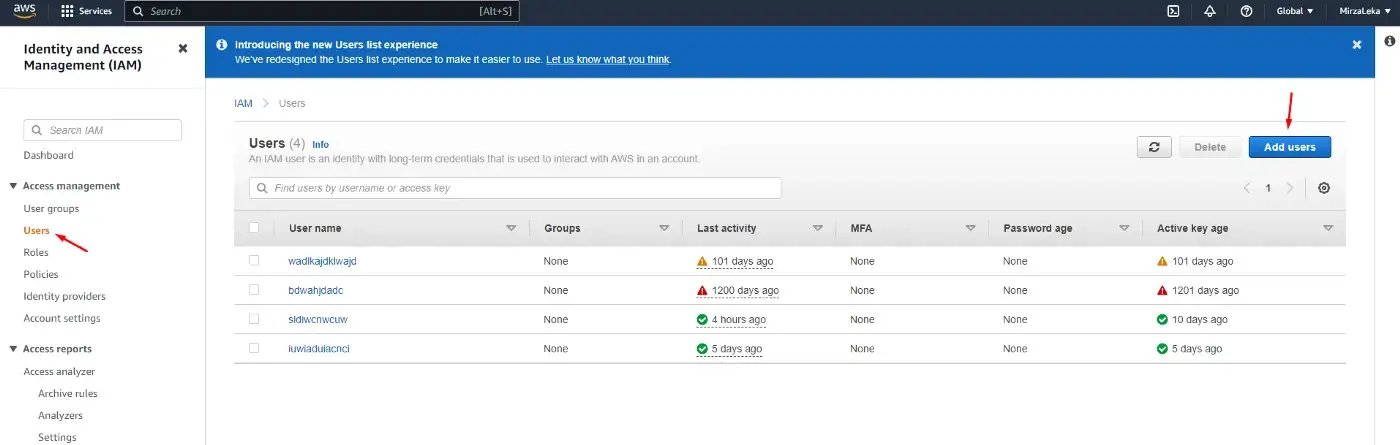
Step 2: Click on Users (under Access Management) in the sidebar on the left, then click on the Add users button to the right.
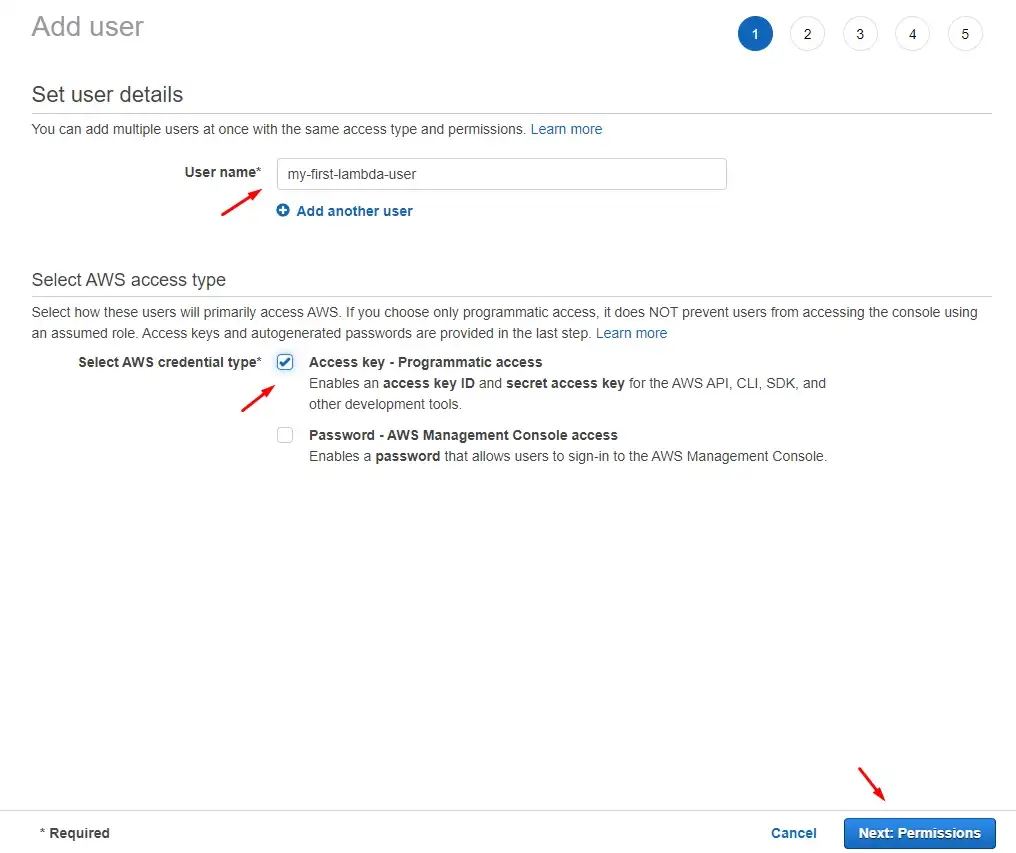
Step 3: On the next screen enter the user name (any name we want) and click on the Access key — Programmatic access checkbox. Then, next.
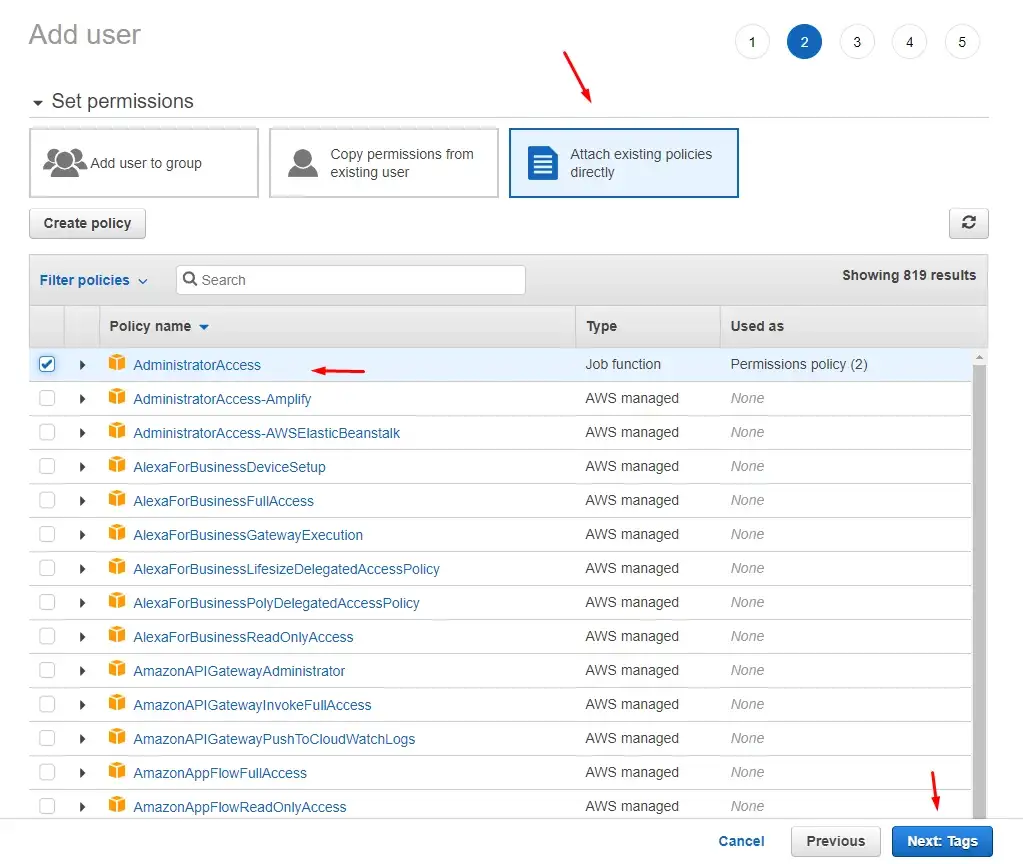
Step 4: On the permissions screen click on Attach existing policies directly, then click on the AdministratorAccess policy and click next. For the sake of this demonstration we go with the Admin policy.
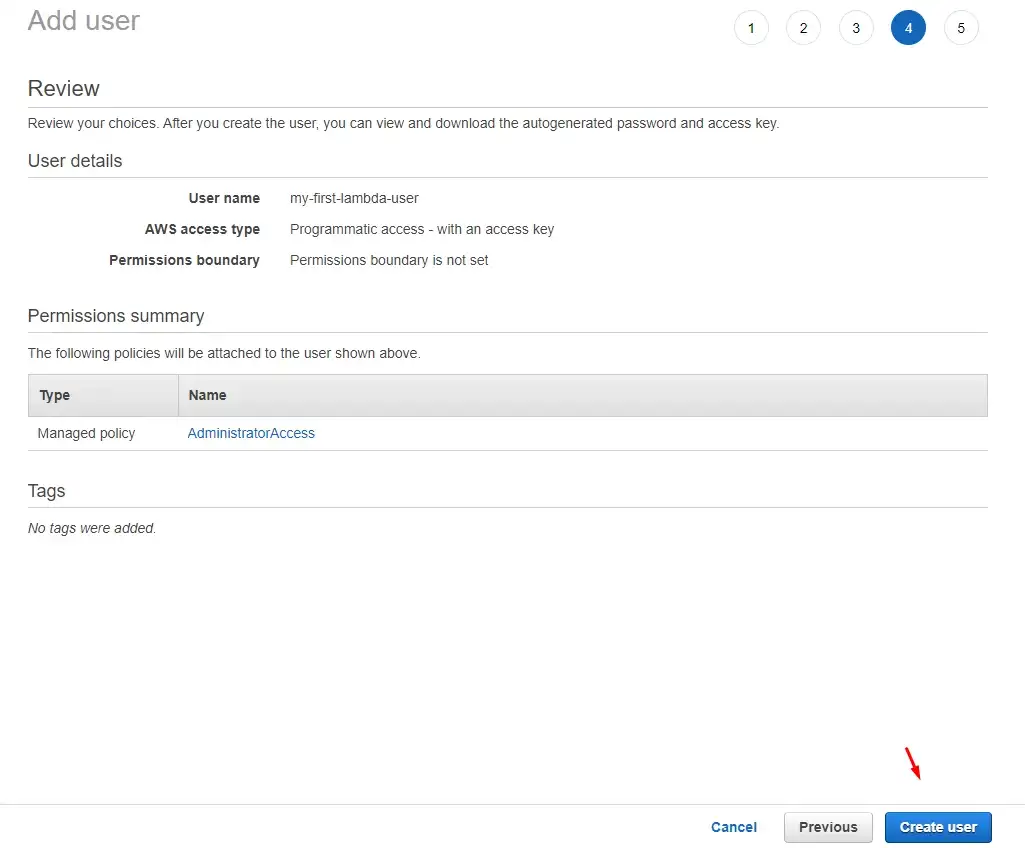
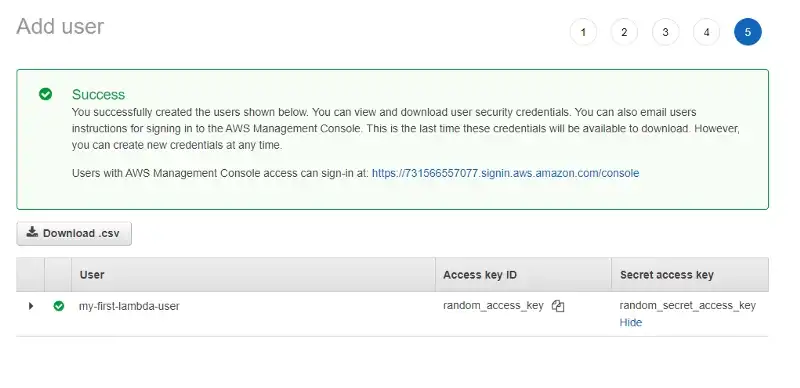
Step 5: We get to the Tags page that we can skip. Then we land on the final page and click the Create user button.
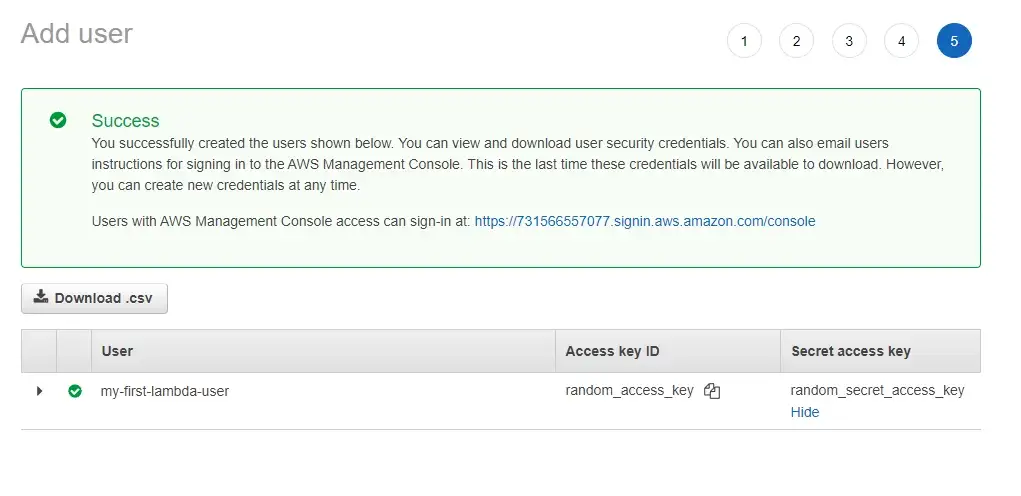
Step 6: On the final screen, we get our access key and secret key that we'll use to authenticate with Serverless Framework. These are super important.
AWS will only show these credentials once and never again. If we lose them, we need to generate new ones. Do not share them with anybody.
We're done with the AWS website for now. Now that we have our AWS Admin user, open up a terminal and install Serverless Framework on your machine:
$ npm i -g serverlessAfter that, sign up to Serverless via the terminal using the credentials we've just generated. (sls is short for serverless)
$ sls config credentials --provider aws --key our_key --secret our_secretThese are now set in stone on our machine. Every AWS deployment we do will directly go to our AWS account. If you wish to change these credentials, go to:
- ~/.aws/credentials on Linux or macOS
- C:\Users\USERNAME\.aws\credentials on Windows
If you have multiple AWS accounts, you can easily switch from deploying Lambda from one account to another just by swapping these credentials.
Creating our First Serverless Function
To start, we can run serverless --help to see the list of commands available to us.
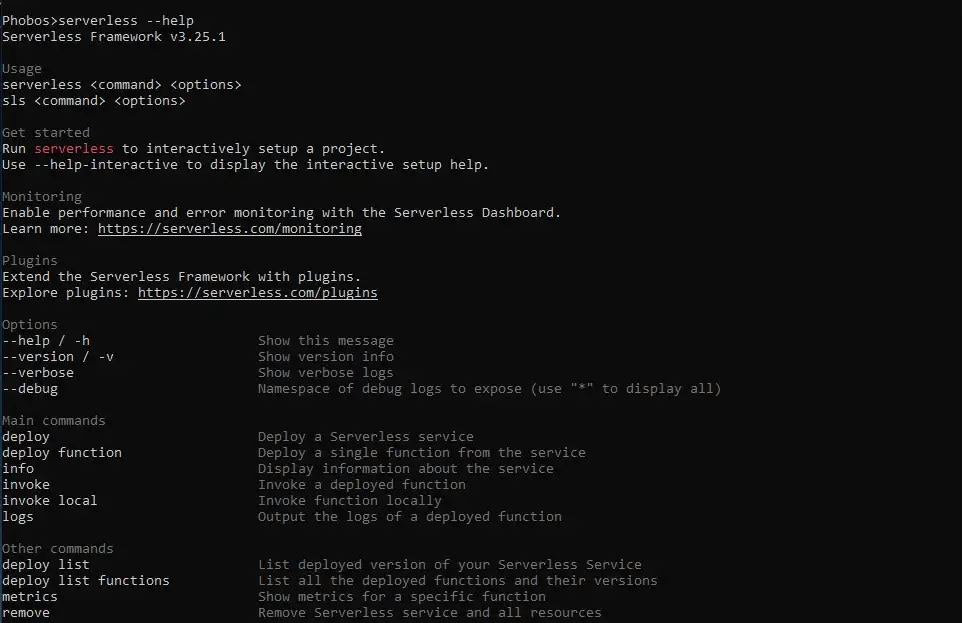
To keep things simple we'll use sls command (short for serverless) from now on.
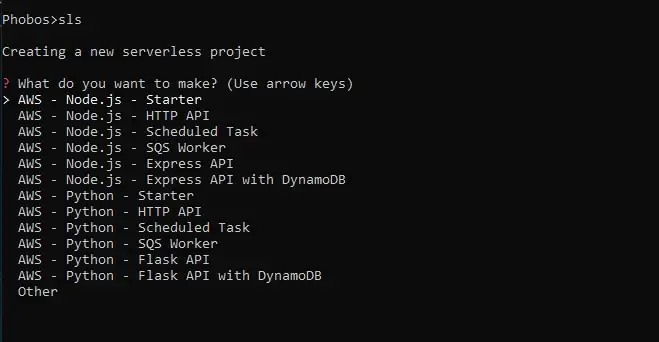
We then pick one of the options and hit enter to generate a project. Another way we can do this is by creating an AWS Node.js template and optionally defining the path (directory) where our app will live.
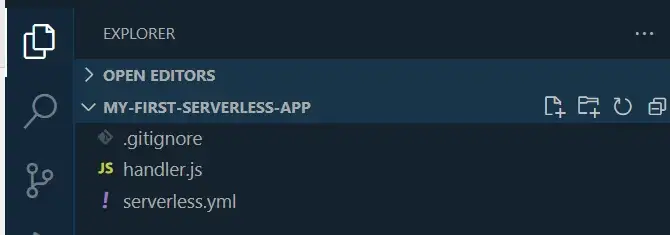
$ sls create --template aws-nodejs --path my-first-serverless-appIf we go into the directory we've just generated, we'll find two files of interest: handler.js and serverless.yml.
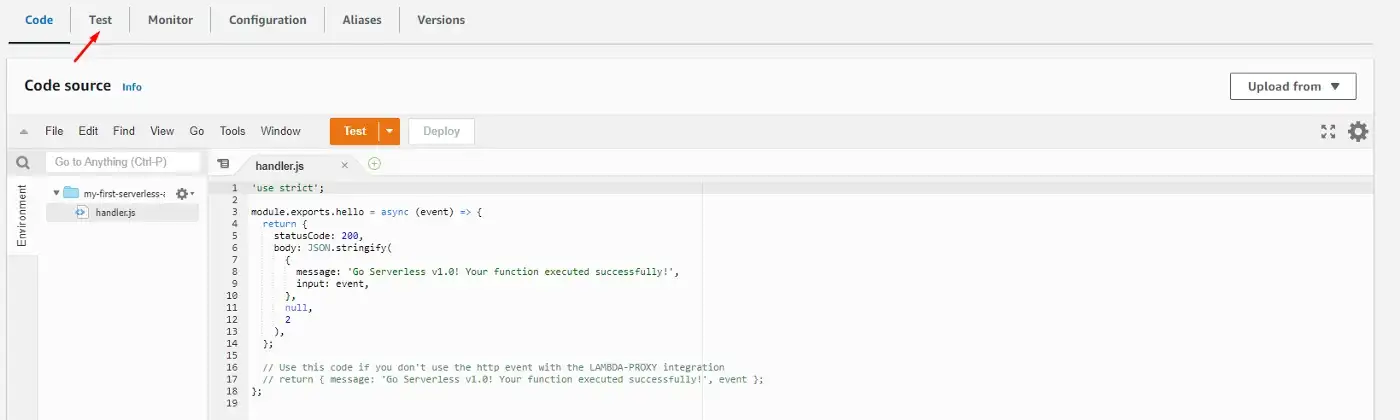
'use strict';

module.exports.hello = async (event) => {
  return {
    statusCode: 200,
    body: JSON.stringify(
      {
        message: 'Go Serverless v1.0! Your function executed successfully!',
        input: event,
      },
      null,
      2
    ),
  };
  // Use this code if you don't use the http event with the LAMBDA-PROXY integration
  // return { message: 'Go Serverless v1.0! Your function executed successfully!', event };
};
The key parts here are the module.exports statement (that uses CommonJS syntax) and the name of the Lambda function hello that returns some response. This is a handler function that is invoked by AWS, thus it must be exported. All of the code related to the function should be within.
Another file we have is the serverless.yml file. This is where we write the infrastructure for our application.
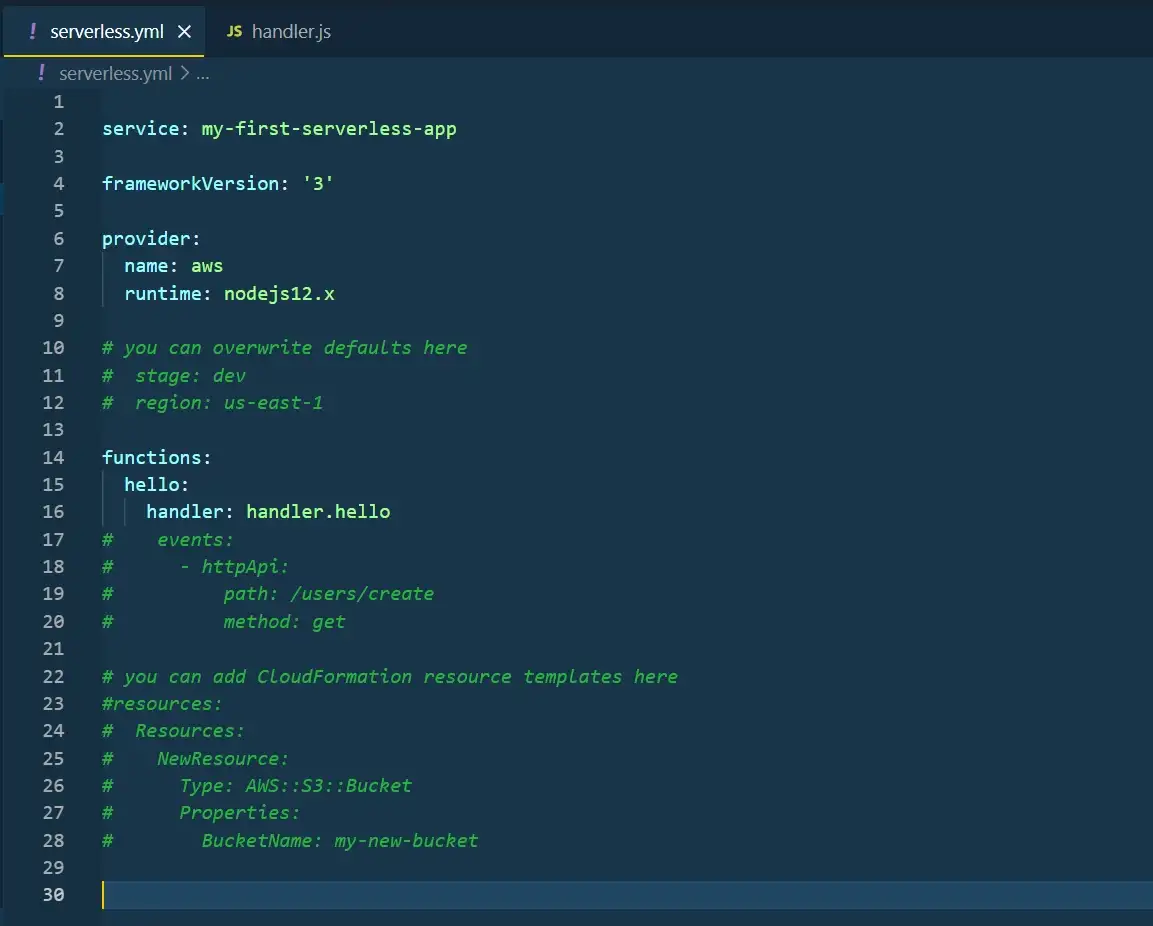
Let's break it down:
- Services — The name of our service that will be generated on AWS.
- Provider — Specify the cloud provider (AWS, Azure, etc) as well as the runtime environment.
- Functions — We can have one or multiple functions invoked by AWS. Every function has a name and a handler. handler.hello represents the file name and the exported function name.
- Events — Lambda triggers that will run the function. Lambda can be activated by HTTP, Socket event, S3 upload, etc.
- Resources — Specify additional resources used by your function, e.g. DynamoDB, S3 Bucket, Cognito, etc.
- Environment — Set up environment variables (secret keys) used by the entire service or per function.
- Plugins — Special additions to your environment, e.g. Serverless-Offline for local invocation or Serverless TypeScript plugin.
Read more on the serverless.yml file.
Deploying and Testing our Function
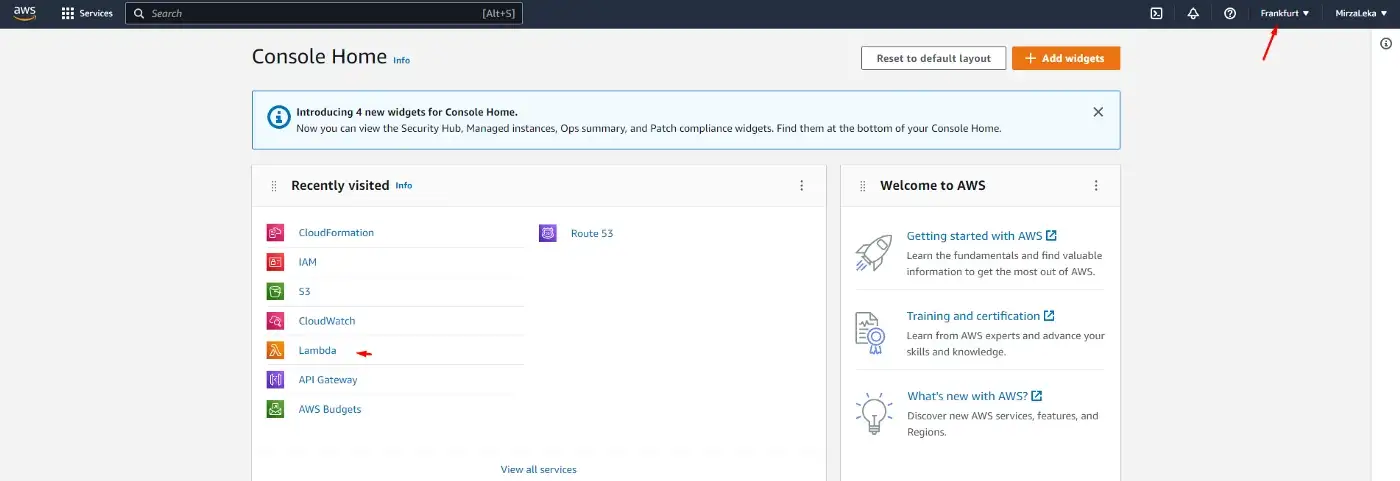
Since I live in Europe, I'll change the region to the one closest to me.
# you can overwrite defaults here
stage: dev
region: eu-central-1
Keep in mind that once you generate a Lambda function in a certain region, it will live in that region. You can swap regions in the main navbar on AWS Console.
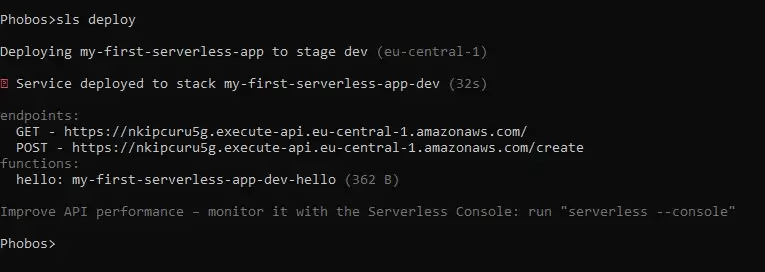
Now let's deploy.
$ sls deploy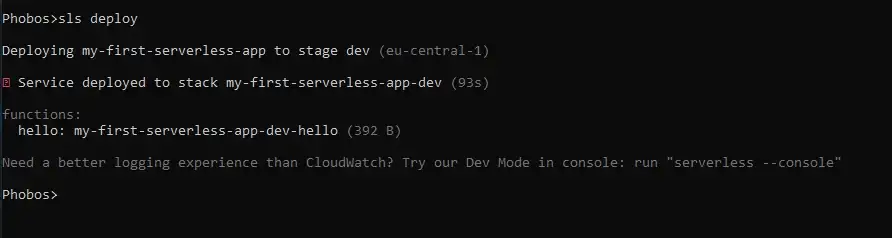
Since this is our first deployment it will take the longest. Now let's go to AWS to see what we have.
Upon deployment, the serverless.yml file generates a CloudFormation stack and links all resources that our function uses.
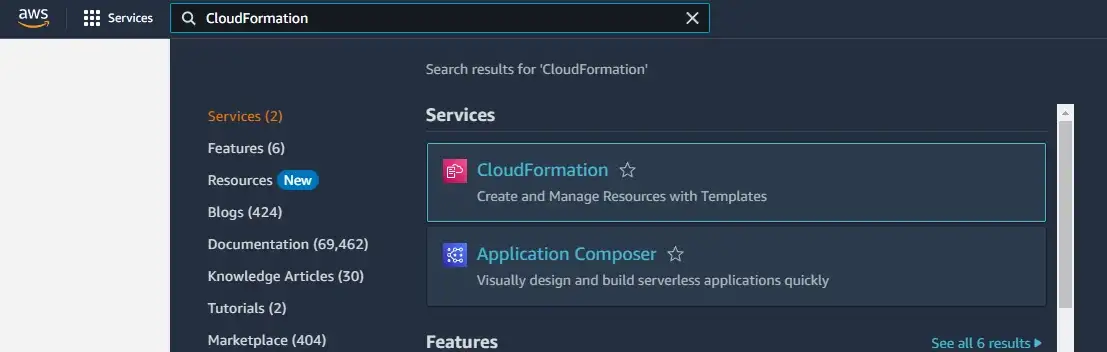
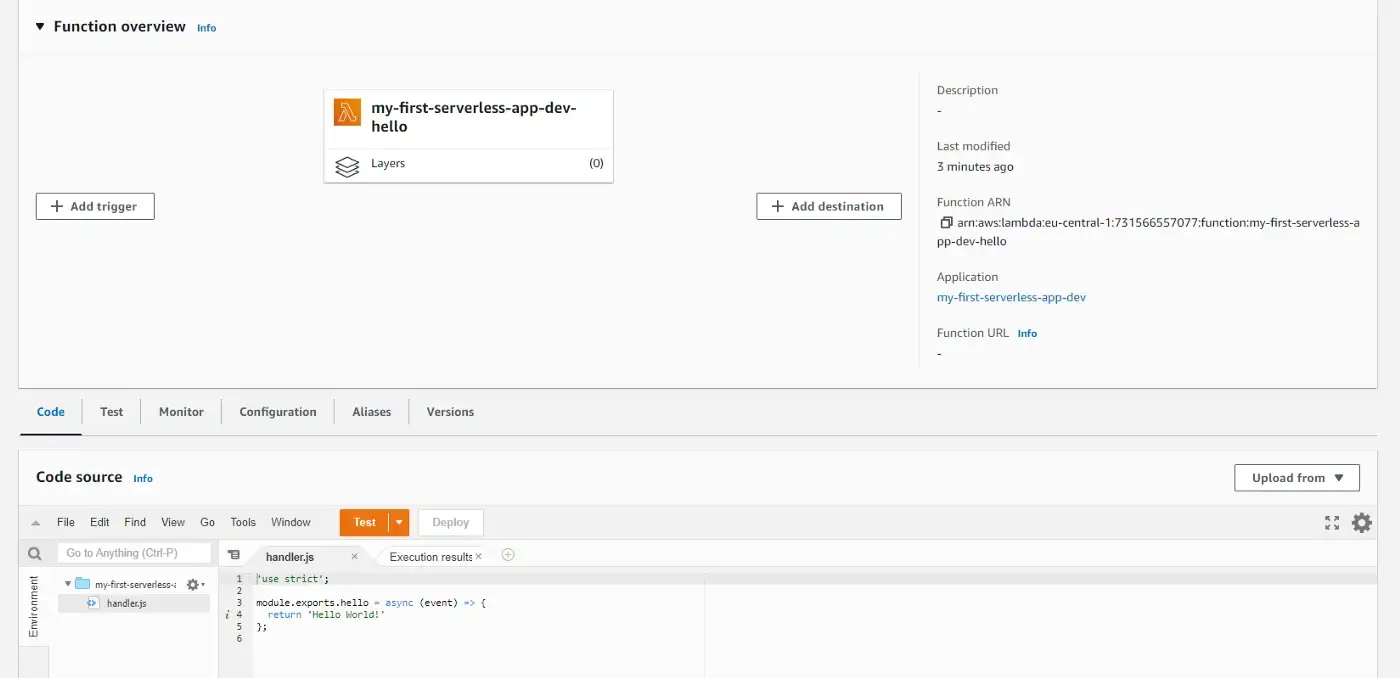
If we search for CloudFormation in the AWS Console and go there, we'll see our function (as long as we're in the correct region).

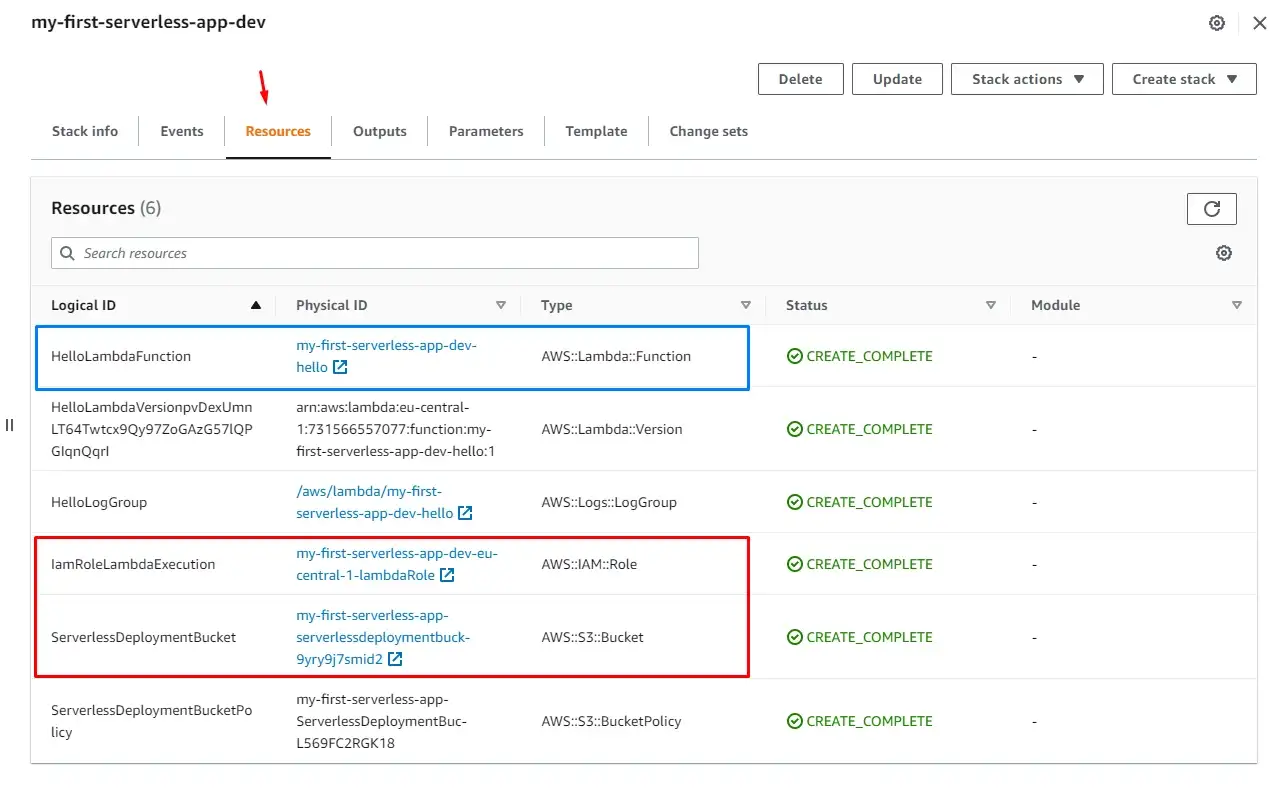
If we click on our function in the table, it will open a new window. Then click on the Resources tab to display all connected resources relevant to our function — the IAM roles, the S3 bucket in which our Lambda is deployed, and the link to the function itself.
Clicking on the function (blue rectangle) will take us to the AWS Lambda screen.
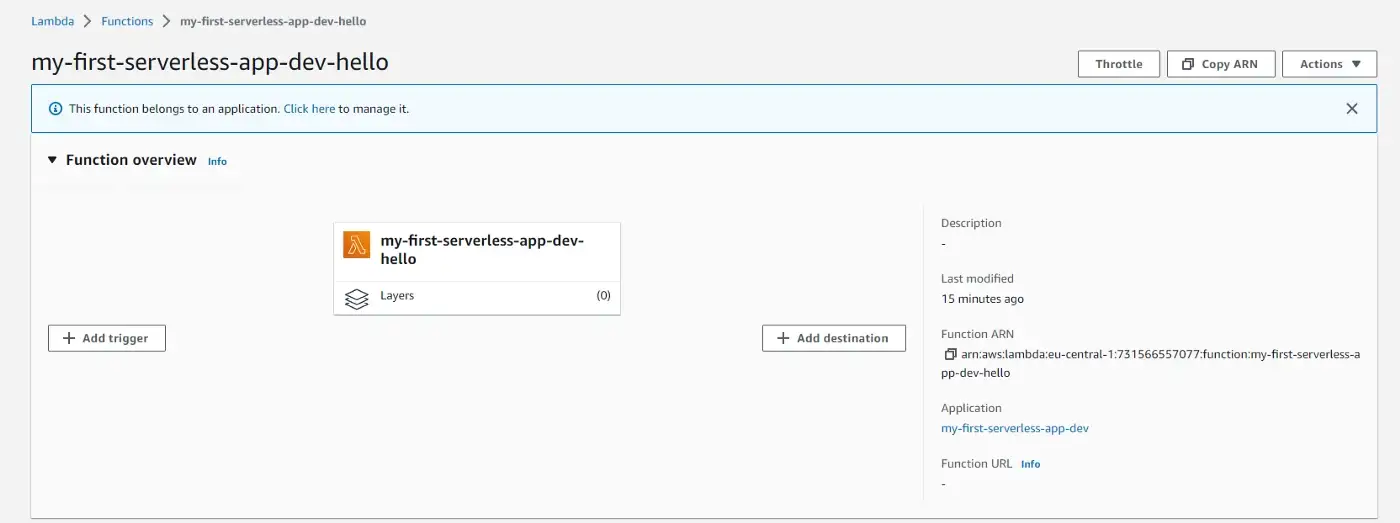
Scrolling down, we can see the code of our function. We can test it by clicking on the orange Test button.

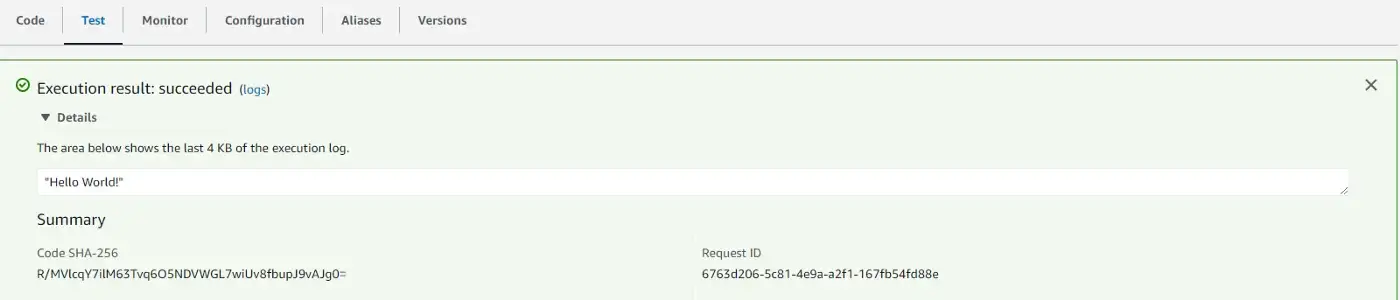
This will pop up a modal for us to write details about our test. We enter the Event name and leave everything else as default.
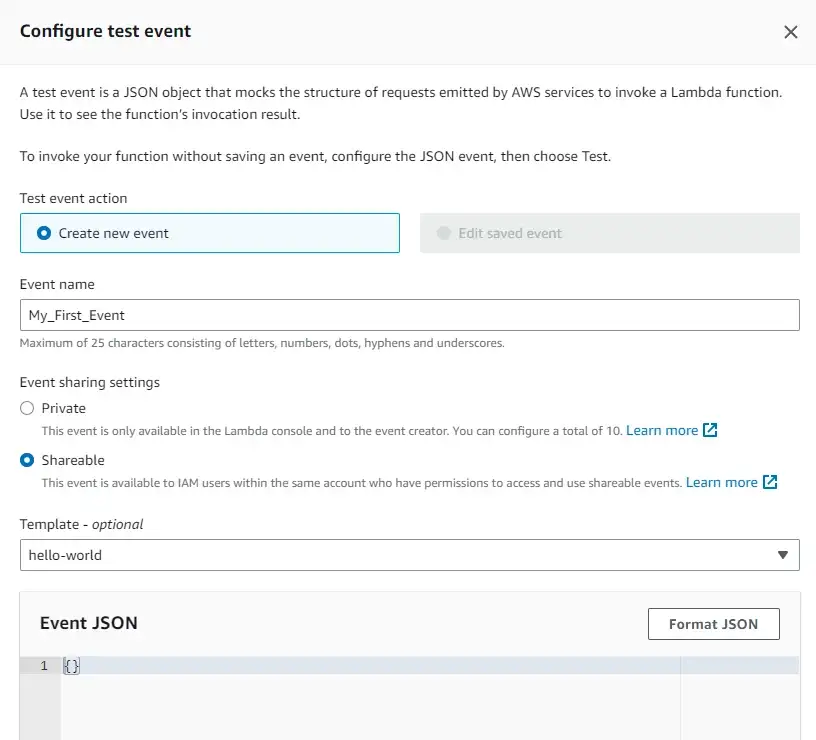
Now click Save on the modal and then on the Test button in the navigation.
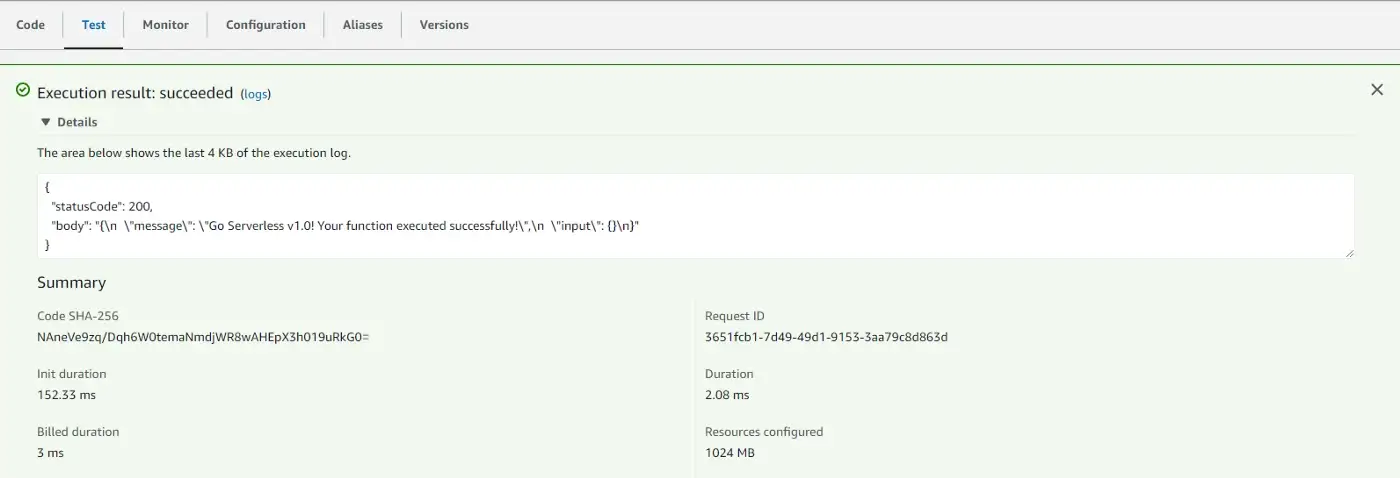
Select the event we've just created and click on the orange Test button again. We see that everything went well and the code returned is what we wrote in the function.
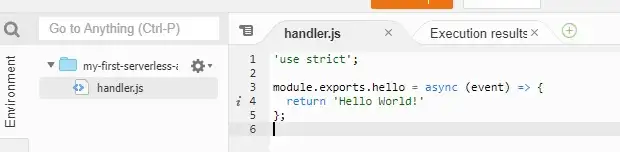
Let's change our function code a bit and deploy it again.
'use strict';
module.exports.hello = async (event) => {
  return 'Hello World!'
};
The event parameter is an object that returns information on the request, such as the request method, body, query parameters, etc.
This time we haven't changed our infrastructure, so we can use a shorthand to just deploy the function code:
sls deploy -f hello // -f is shorthand for function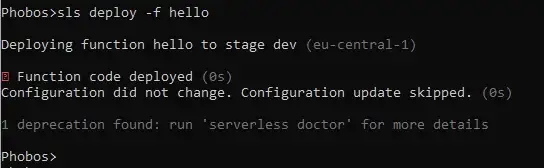
Then we can head over to the AWS Console and once again test our code.
Now you might be wondering can we use NPM modules in our Lambda functions? Yes, we can! However, there are things to keep in mind:
- Lambda can't run the NPM build for us, so we have to upload (deploy) the node_modules folder with the function.
- Lambda functions are limited to 50 MB. If our folder exceeds this limit, we can Dockerize the whole project and deploy it to AWS ECS.
Alternatively, we can upload our code to the S3 bucket and link Lambda to S3 — which is what the Serverless Framework is already doing for us behind the scenes.

From here we can add triggers to our Lambda function, setup timeout, and other configuration options, but we won't do it in that manner. We're using Serverless Framework to set up infrastructure — so that we do not need to click around.
Creating APIs with Serverless Framework
To invoke our Lambda function from our client (web, mobile application, or Postman), we need to set up an entry point — the API Gateway.

To do this we edit the serverless.yml file and include the HTTP API in the events section.
functions:
hello:
handler: handler.hello
events:
- httpApi:
path: /
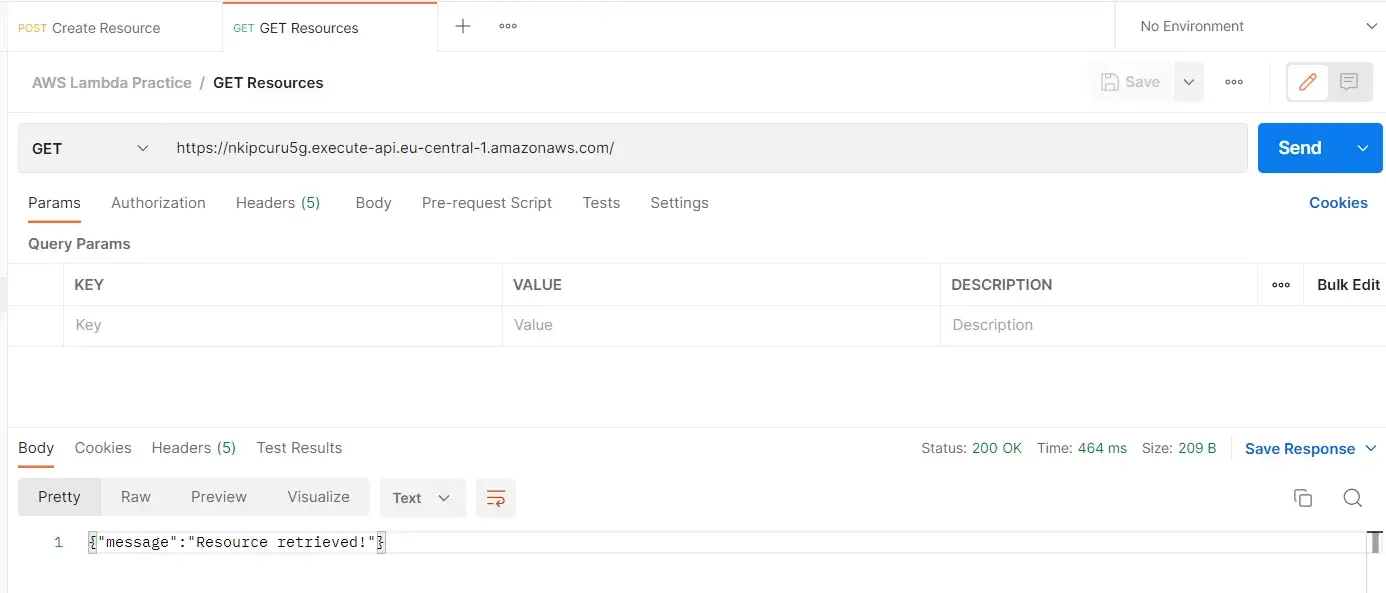
method: get$ sls deploy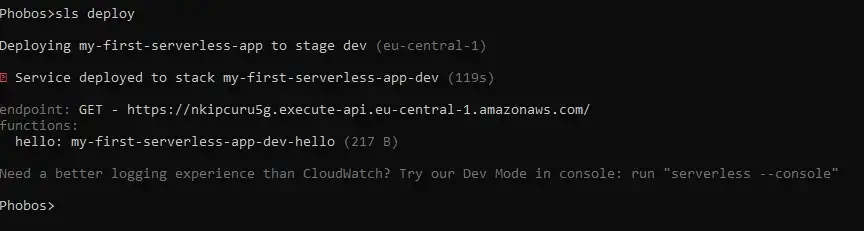
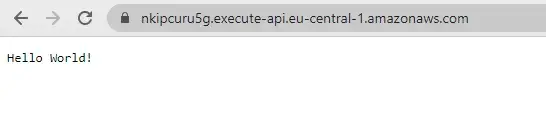
This time we also get an API endpoint as a response. If we visit this URL in the browser it should return the correct response.
Another way to invoke this API is directly from the terminal:
$ sls invoke -f hello -l // where -f stands for function and -l for logs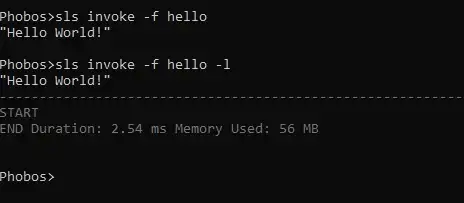
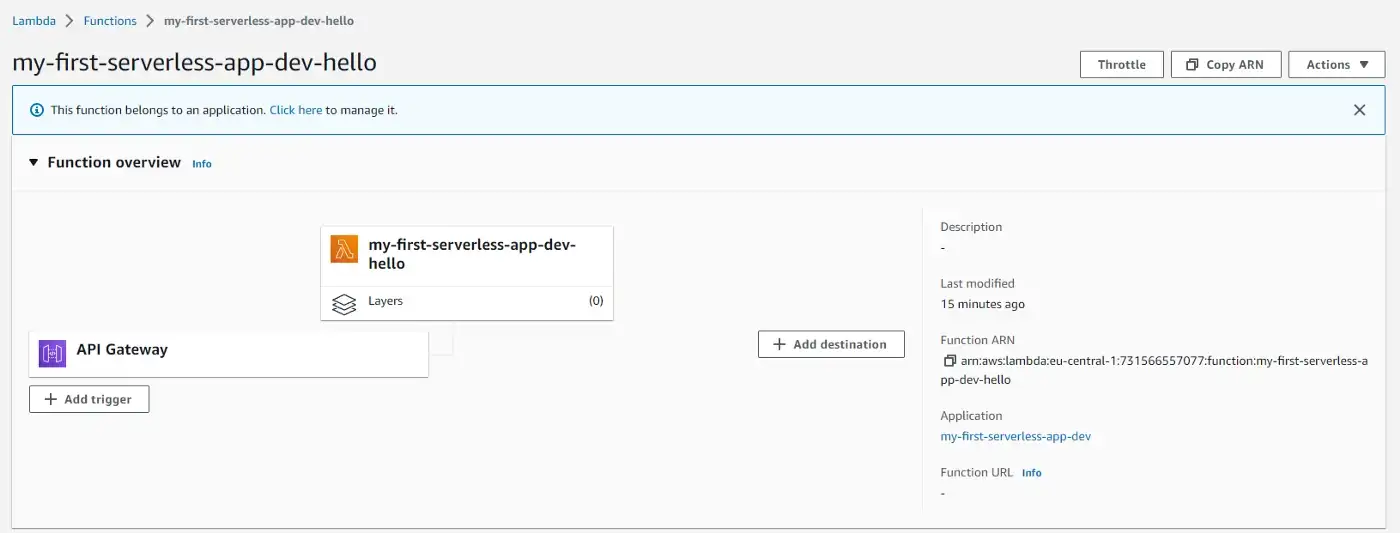
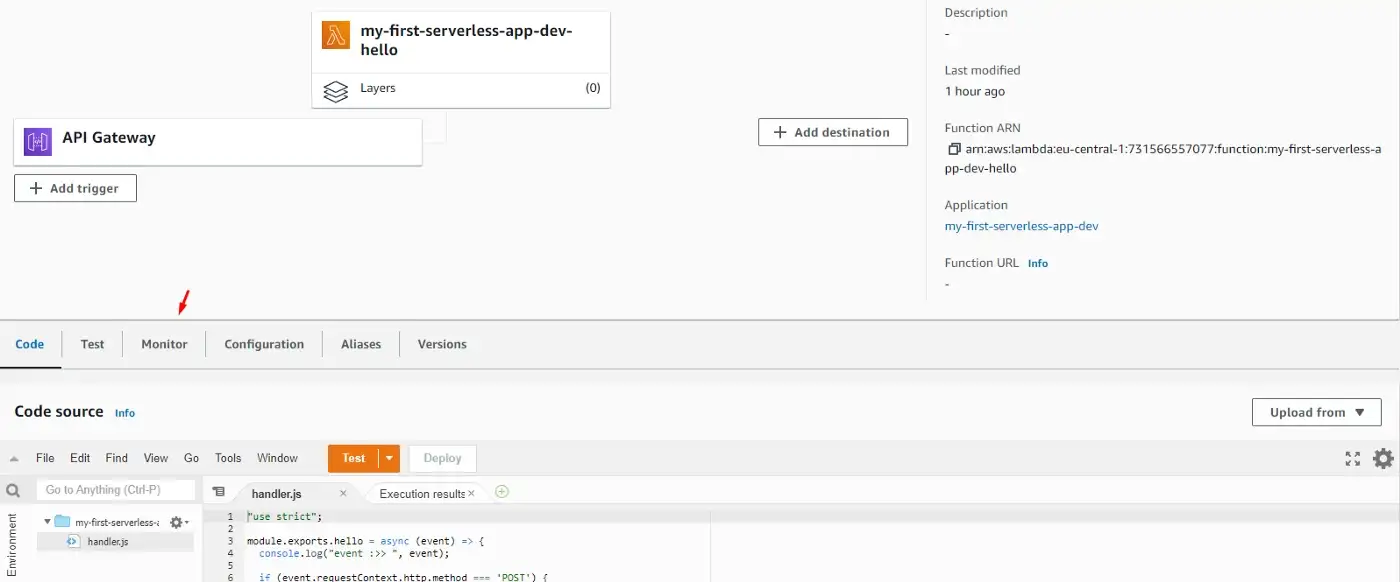
If we go to our Lambda Function in the AWS Console, we can see that the function now has a link to the API Gateway.
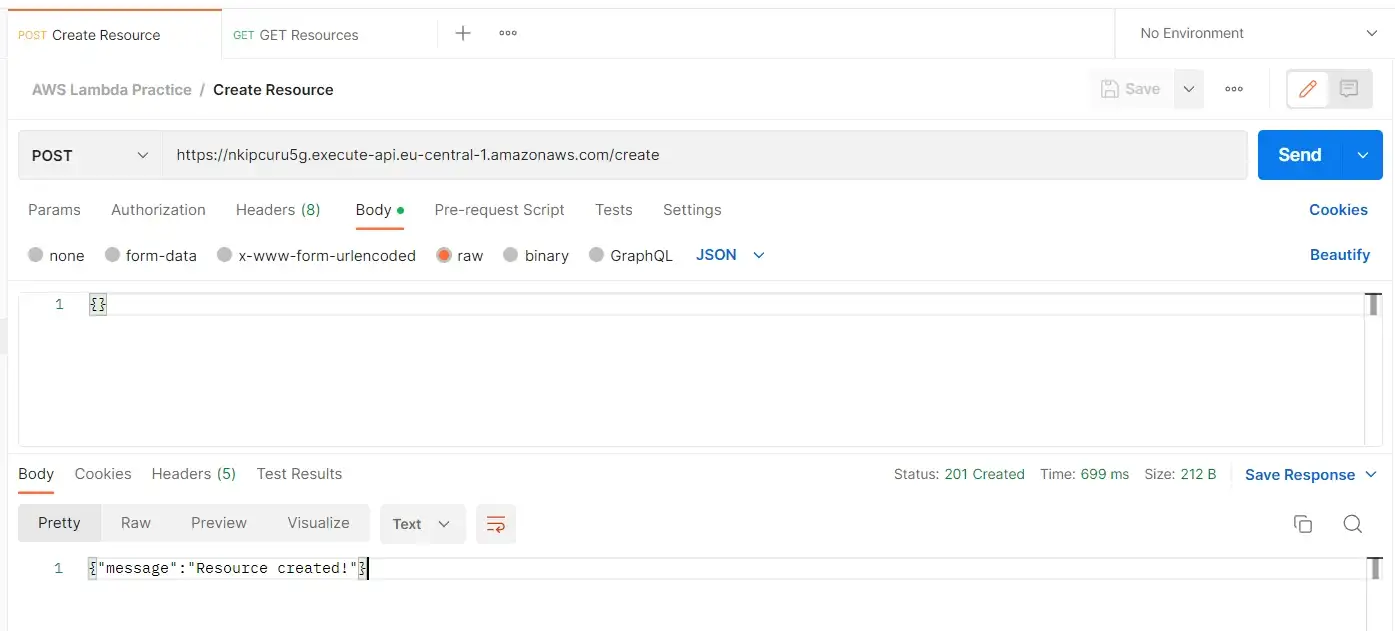
Adding POST Request
Let's expand our function with another route. We can retrieve the HTTP method from the event object and then write the implementation. Here I'm also logging the event object to the console.
module.exports.hello = async (event) => {
  console.log('event :>> ', event);

  if (event.requestContext.http.method === 'POST') {
    return {
      statusCode: 201,
      body: JSON.stringify({
        message: 'Resource created!',
      }),
    };
  }

  return {
    statusCode: 200,
    body: JSON.stringify({
      message: 'Resource retrieved!',
    }),
  };
};
Now let's modify the YAML file:
functions:
  hello:
    handler: handler.hello
    events:
      - httpApi:
           path: /
           method: get
      - httpApi:
           path: /create
           method: post
What we've done here is created two routes in the same file. We can also create multiple functions (handler files) and separate each route into its own function. Read more about Serverless Architecture Patterns.
We'll also allow CORS in the provider section so that everyone can access our routes:
provider:
  name: aws
  runtime: nodejs12.x
  httpApi:
    cors: true
Let's run the deploy command again:
$ sls deployNow we have two endpoints that we can interact with.
Let's test these routes in Postman:
One important step for sending a POST request is to set a Content-Type header to application/json.

Web Application:
const URL = `https://nkipcuru5g.execute-api.eu-central-1.amazonaws.com`;

fetch(URL, options)
  .then((response) => {
    return response.json();
  })
  .then((jsonObject) => {
    console.log(jsonObject) // {message: 'Resource retrieved!'}
  })
  .catch((error) => {
    console.error(error);
  });
const options = {
method: 'POST',
data: {},
headers: {
'Content-Type': 'application/json'
}
};
const URL = `https://nkipcuru5g.execute-api.eu-central-1.amazonaws.com/create`;
fetch(URL, options)
.then((response) => {
return response.json();
})
.then((jsonObject) => {
console.log(jsonObject) // {message: 'Resource created!'}
})
.catch((error) => {
console.error(error);
});Monitoring with CloudWatch & Serverless Console
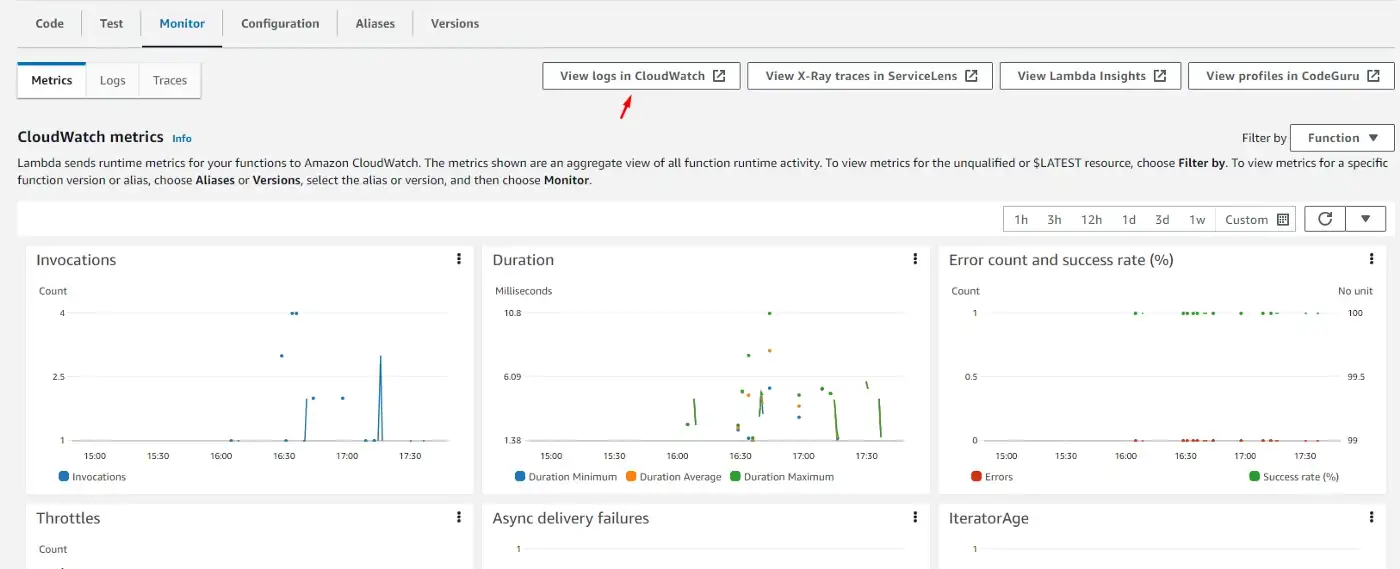
To better understand what is going on in our functions we can go to the CloudWatch service. The easiest way to find logs for our function is to go to the function screen and click on the Monitor tab.
This opens a list of options, but what we're interested in is the View logs in CloudWatch option.
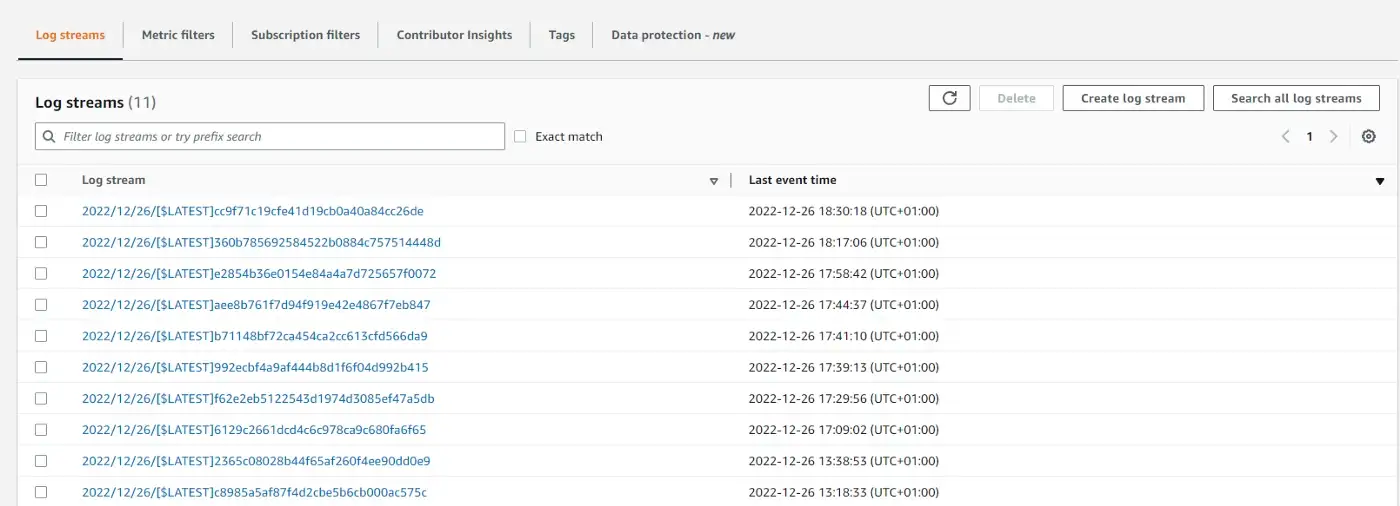
Then we get to the page where we can see logs in order and click on each to preview what happened at that point in time.
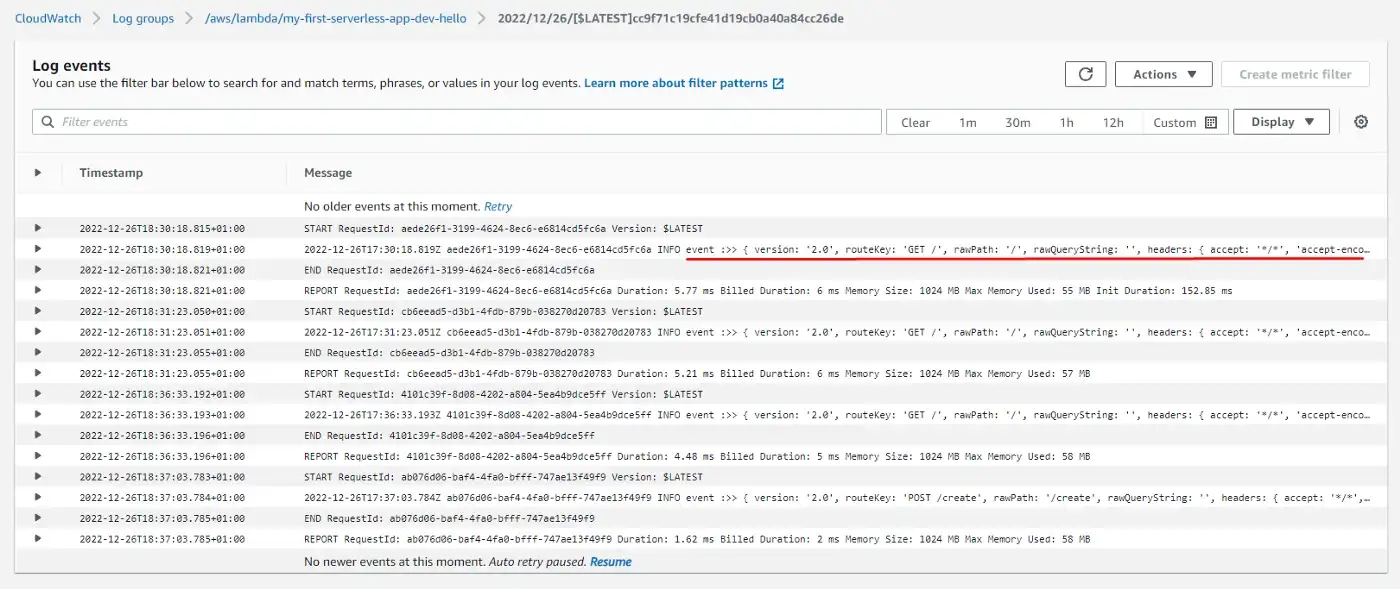
Here we can see the list of events that occurred and even our event object that we previously logged to the console.
Another way to monitor logs is to use Serverless Console provided by the Serverless Framework. To enable it, simply run:
$ sls --consoleFirst, it prompts to enable access to AWS and create an IAM role.
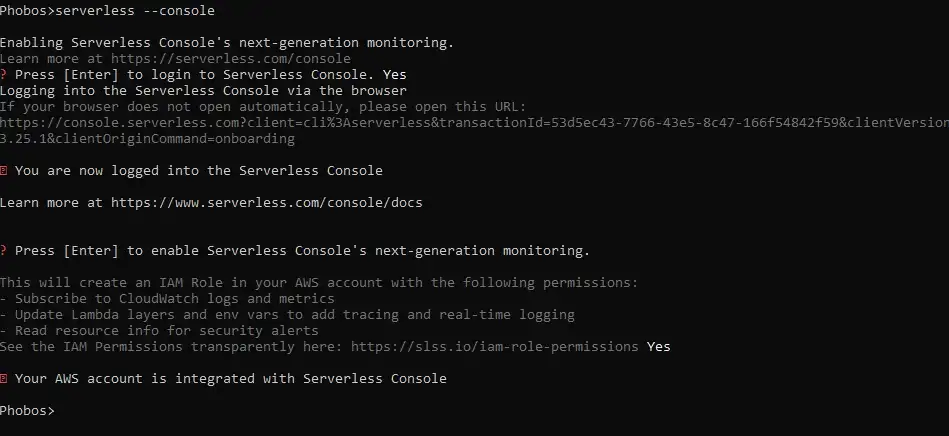
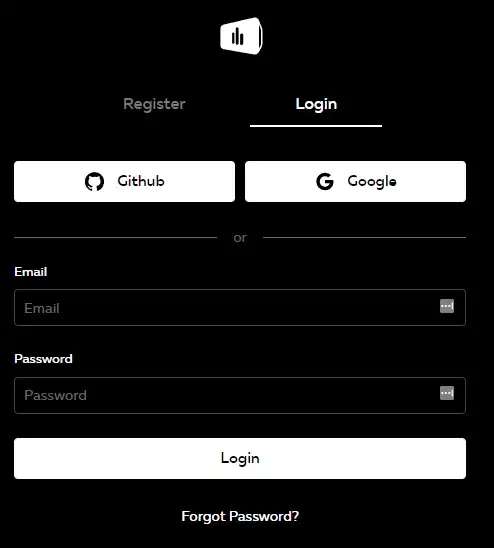
Then we need to register or log in to the Serverless Dashboard opened in the browser.
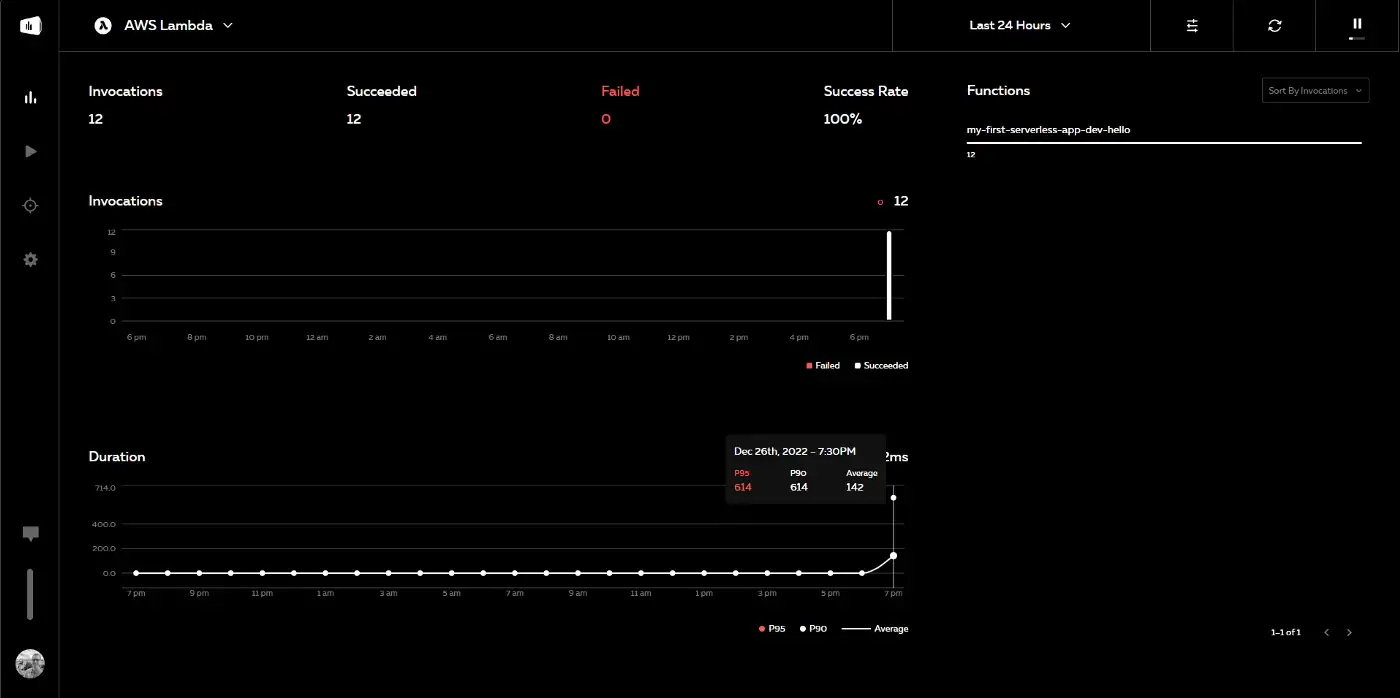
After a few minutes of setup, we go to the Serverless Console and find our service. We also need to enable Logs, Traces, and Dev mode.

Then make a few requests (GET or POST) and the metrics will appear almost in real-time.
Running Serverless Functions Offline
Developing features and then deploying only to be able to test them in production is a huge time consumer. The Serverless Framework team created the Serverless Offline feature that allows us to test our code locally.
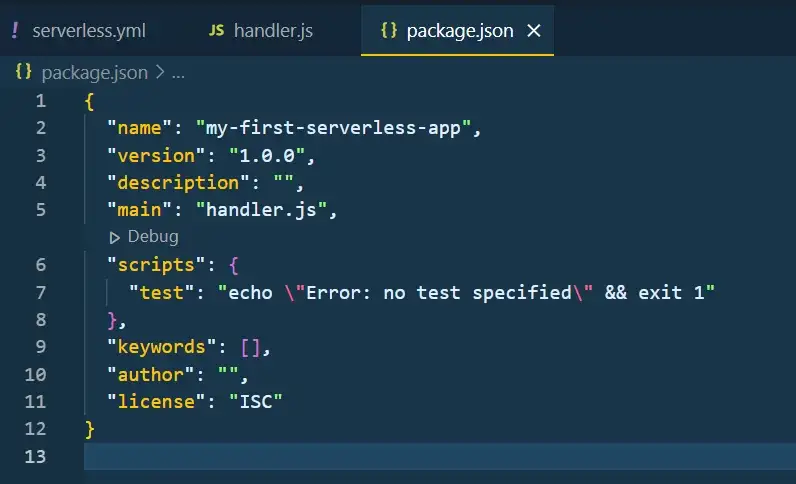
To start we need to initialize an NPM project:
$ npm init -y
This will create a package.json file in the project directory.
Now let's install serverless-offline as a dev-dependency:
$ npm i --save-dev serverless-offlineThe next step is to add a serverless-offline plugin to our serverless.yml file:
plugins:
  - serverless-offline
With this in place, we can use the help command to verify that everything is set correctly:
$ serverless-offline --help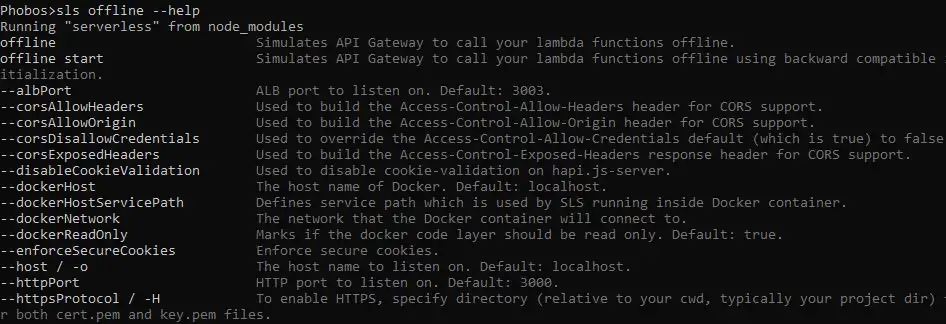
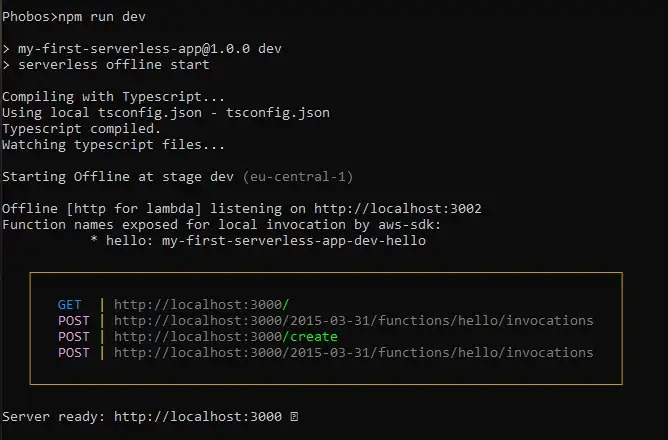
Now we run Serverless locally:
$ sls offline start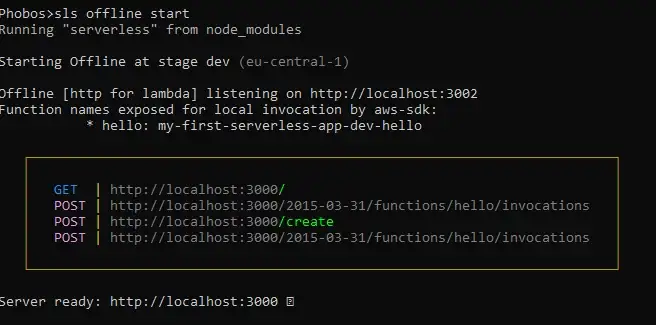
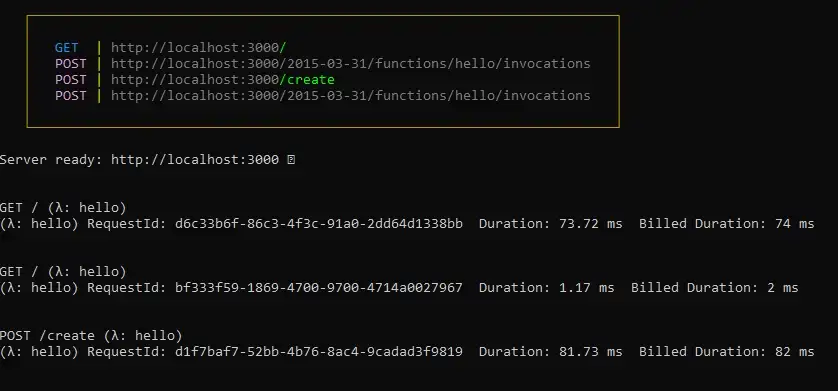
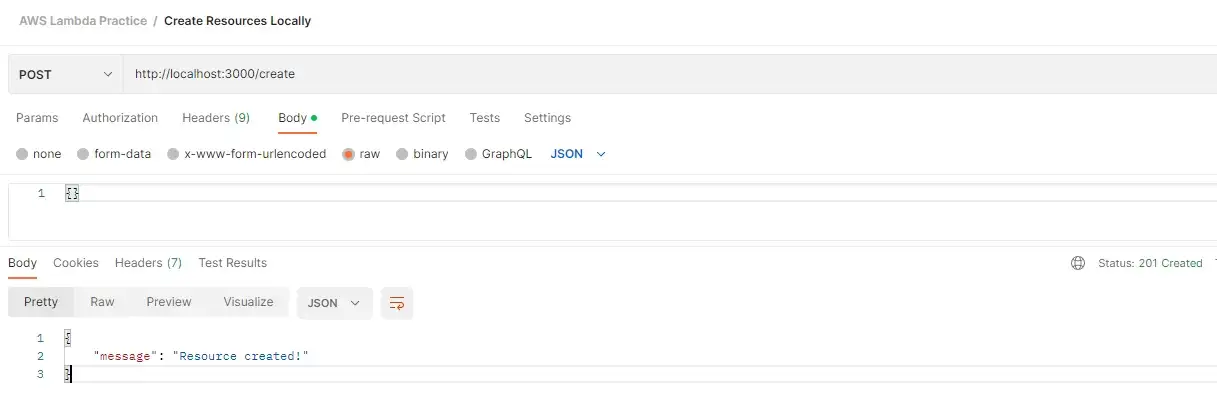
Now let's test it using Postman:
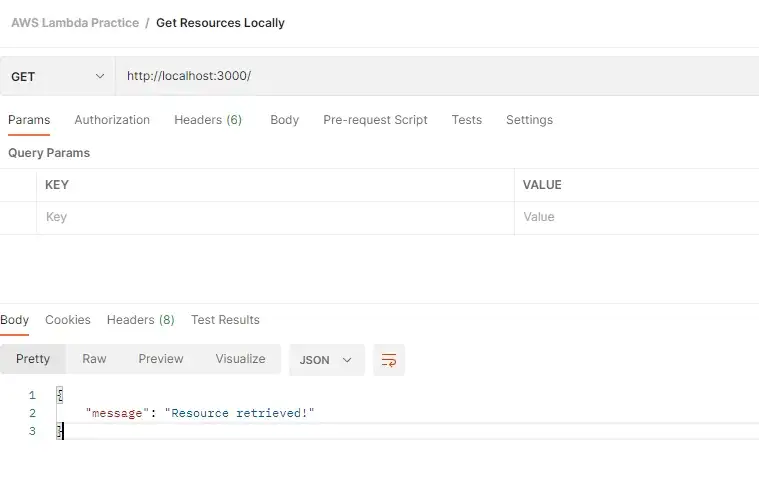
And we can see our requests logged in the console.
If we need to make a code change, we simply shut down the server (CTRL/CMD + C) and run it again. For NPM geeks, we can bind this command to a script in the package.json file:
{
  "name": "my-first-serverless-app",
  "version": "1.0.0",
  "description": "",
  "main": "handler.js",
  "scripts": {
    "dev": "serverless offline start"
  },
  "keywords": [],
  "author": "",
  "license": "ISC",
  "devDependencies": {
    "serverless-offline": "^12.0.3"
  }
}
Now we can run:
$ npm run dev
# or if you're using yarn
$ yarn dev
Using Environment Variables
Sometimes in our apps, we want to add special keywords, like external API keys, JWT secrets, DB connection strings, etc. We can define Environment variables in the provider section of our YAML:
provider:
name: aws
runtime: nodejs12.x
httpApi:
cors: true
environment:
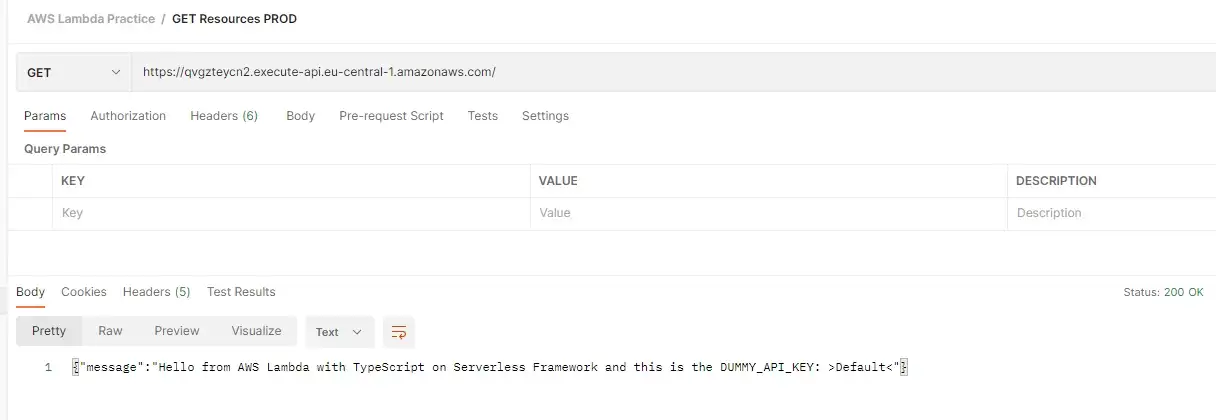
DUMMY_API_KEY: 'Dummy value'Then we can access this variable using process.env object in handler.js:
module.exports.hello = async (event) => {
  console.log('Dummy env var :>> ', process.env.DUMMY_API_KEY);
  ...
}
If we make another request to a server, we should see this log printed in the terminal.

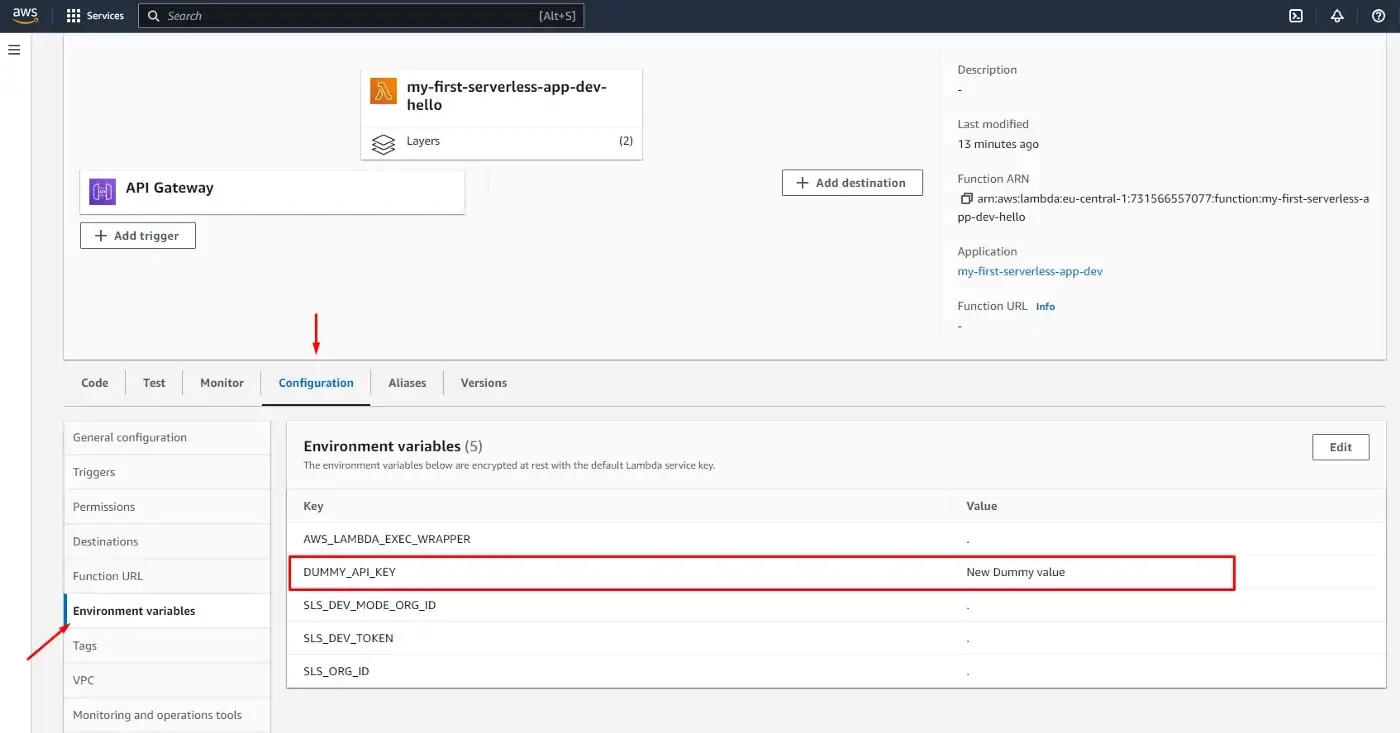
The previously set Environment variable was global for the whole service, but we can also set variables per function that will override the global ones (if named the same):
functions:
  hello:
    handler: handler.hello
    environment:
      DUMMY_API_KEY: 'New Dummy value' # will override the previous
    events:
      - httpApi:
          path: /
          method: get
      - httpApi:
          path: /create
          method: post
Once the variables are set, we can find them on the AWS Lambda screen, under Configuration > Environment variables.
Read more on Environment variables in Serverless Framework.
Handling Errors

At some point, we may want to validate the user's input. Here we set up a condition to validate the request body and if it's invalid, we return an error.
module.exports.hello = async (event) => {

  if (event.requestContext.http.method === 'POST') {

    if (!event.body) {
      console.log('gonna throw error')
      throw new Error('Body field is required')
    }

    return {
      statusCode: 201,
      body: JSON.stringify({
        message: "Resource created!",
      }),
    };
  }
  ...
}
Then we run this using Postman and take a peek into the terminal.

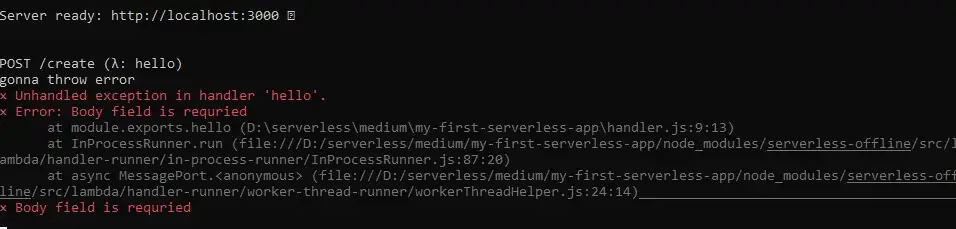
That didn't go as expected. We have two problems:
- JavaScript built-in Error class does not have HTTP status codes
- This error is unhandled (and our application is potentially down)
To solve the first issue, we'll install and set up the http-errors NPM package:
$ npm i http-errorsconst createError = require('http-errors'); // importing package
module.exports.hello = async (event) => {
if (event.requestContext.http.method === 'POST') {
if (!event.body) {
throw createError(400, `Field "body" is required!`); // using it
}Now we get a more readable error.
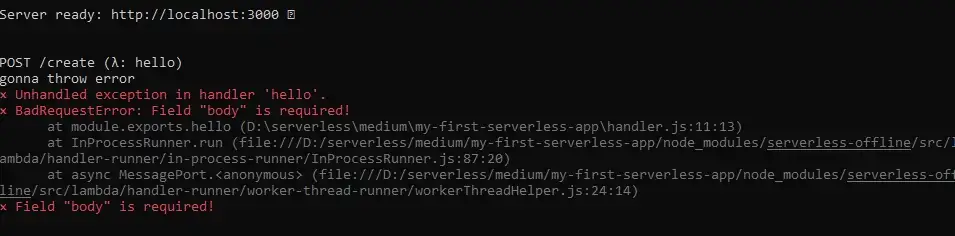
However, the status code is still 200. To fix this we need to introduce error-handling logic.
Middlewares
Onto the second problem — we'll enhance our Lambda function with middlewares. For that, we have an NPM package called Middy.
$ npm i @middy/core @middy/http-error-handler @middy/error-loggerWe've just installed three packages:
- Middy Lambda function wrapper
- error handler
- error logger (so that we do not need to log errors manually)
First, we wrap the whole function with middy. Then we make use of use() function, attach it to the end of the middy function and pass each middleware we want to use.
const middy = require('@middy/core');
const httpErrorHandler = require('@middy/http-error-handler');
const errorLogger = require('@middy/error-logger');
module.exports.hello = middy(async (event) => {
...
})
.use(httpErrorHandler())
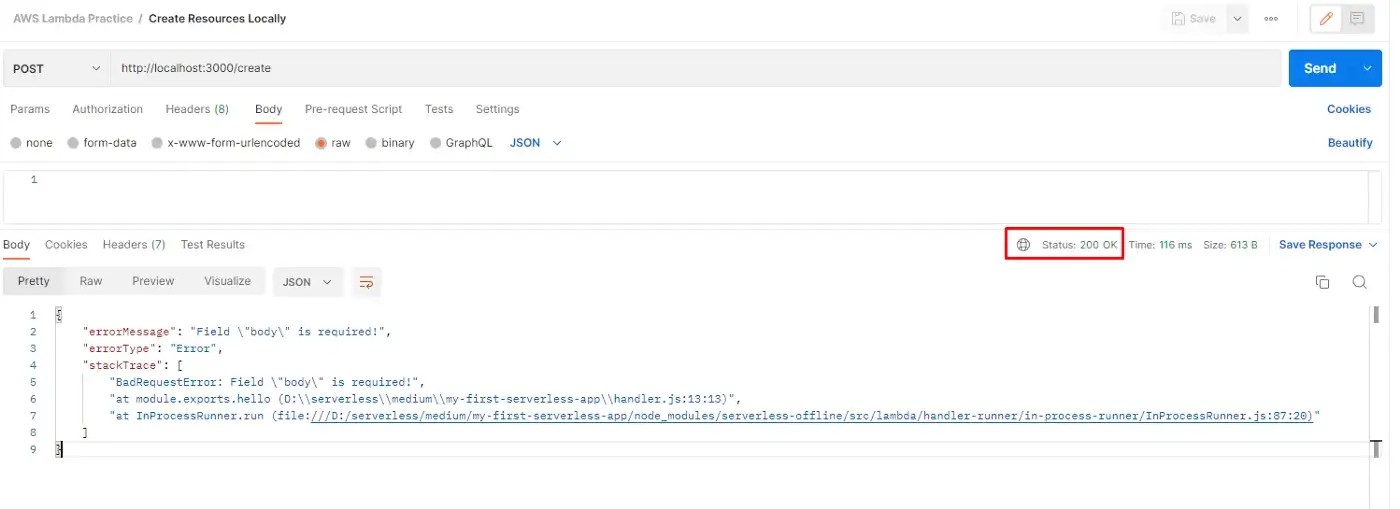
.use(errorLogger())Let's send an invalid request.

Error is thrown as expected, but the app is still up. If we look into Postman, we can see that the HTTP status code is now 400 (Bad Request).

And of course, if we send the body in the request (even if it's empty), the response will be successful.
Middy middleware is more than an error handler. We can use it to normalize requests, hide unwanted headers, cache response, set up CORS, SSM, etc. Read more on Middy.
Important: The latest version of Middy (4.0.9) is not compatible with Node.js 12. If you're using Node.js 14 or lower use these package versions:
"@middy/core": "^2.5.7",
"@middy/error-logger": "^2.5.7",
"@middy/http-error-handler": "^2.5.7"
To use the latest Middy version, go to the provider section of the YAML file and change the Node.js runtime version to 16:
provider:
  name: aws
  runtime: nodejs16.x
Then deploy and everything should work as expected:
$ sls deploy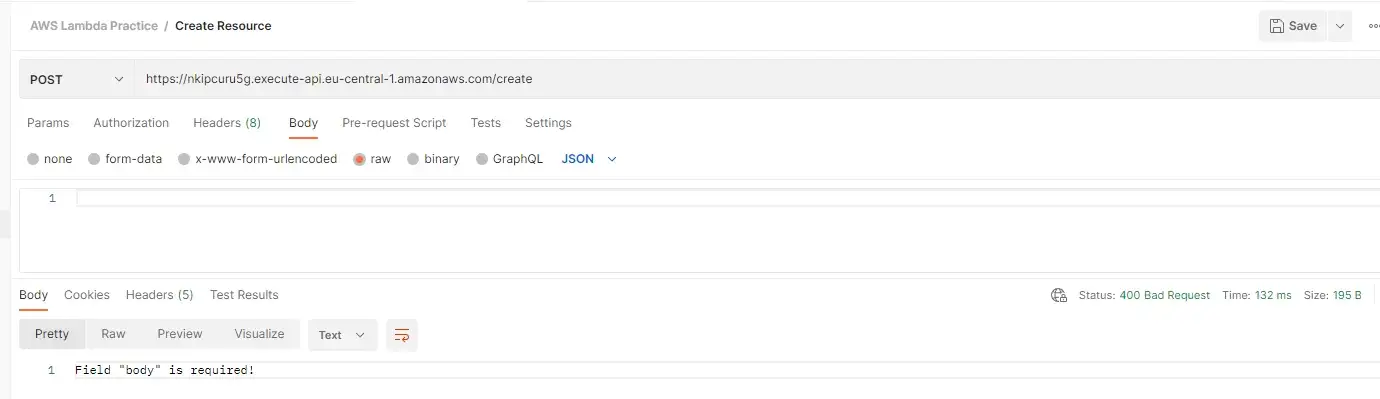
TypeScript
Let's also add type safety to our functions. We'll begin by installing some packages:
$ npm i aws-lambda
$ npm i --save-dev @types/aws-lambda @types/node @types/http-errors serverless-plugin-typescript typescript
We do not need to reinstall Middy as this package supports TypeScript out of the box. We also need to initialize TypeScript to get the tsconfig.json file:
tsc --initAnd add the plugin we've just installed (serverless-plugin-typescript) to the plugins section in our YAML file:
plugins:
- serverless-offline
- serverless-plugin-typescript
The beauty of this plugin is that it will do TypeScript builds for us. Upon running, it will create a .build directory specified in the tsconfig.json file. Now we can rename our handler.js file to handler.ts and begin refactoring.
tsconfig.json
{
  "compilerOptions": {
    "preserveConstEnums": true,
    "strictNullChecks": true,
    "sourceMap": true,
    "allowJs": true,
    "target": "es2017",
    "outDir": ".build",
    "moduleResolution": "node",
    "lib": ["es2017"],
    "rootDir": "./",
    "strict": true,
    "module": "commonjs",
    "esModuleInterop": true
  },
  "include": ["**/*"],
  "exclude": ["node_modules", "**/*.spec.ts"]
}
handler.ts
import { APIGatewayEvent } from 'aws-lambda';
import middy from '@middy/core';
import httpErrorHandler from '@middy/http-error-handler';
import errorLogger from '@middy/error-logger';
import createError from 'http-errors';

export const hello = middy(async (event: APIGatewayEvent) => {
  if (event.requestContext.routeKey?.includes('POST')) {
    if (!event.body) {
      throw createError(400, 'Field "body" is required!');
    }

    return {
      statusCode: 201,
      body: JSON.stringify({
        message: 'Resource created!',
      }),
    };
  }

  return {
    statusCode: 200,
    body: JSON.stringify({
      message: 'Hello AWS Lambda TypeScript on Serverless Framework!',
    }),
  };
})
  .use(httpErrorHandler())
  .use(errorLogger());
serverless.yml
service: my-first-serverless-app

frameworkVersion: '3'

provider:
  name: aws
  runtime: nodejs16.x
  httpApi:
    cors: true
  environment:
    DUMMY_API_KEY: 'Dummy value'

  stage: dev
  region: eu-central-1

functions:
  hello:
    handler: handler.hello
    environment:
      DUMMY_API_KEY: 'New Dummy value'
    events:
      - httpApi:
          path: /
          method: get
      - httpApi:
          path: /create
          method: post

plugins:
  - serverless-offline
  - serverless-plugin-typescript
Let's run npm run dev:
Push Changes to Git & Create Deployment Pipeline
Instead of manually deploying every time we make a change, we want to deploy our changes to AWS every time we push our code to Git.
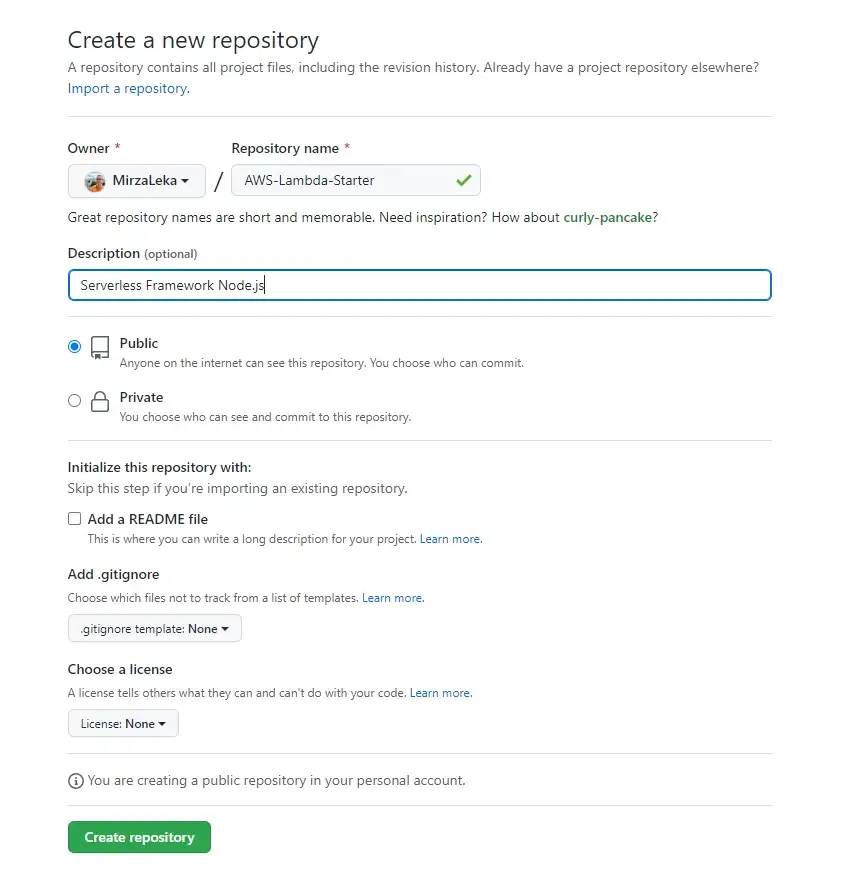
First, log into your GitHub account and create a new repository. On the next screen, give the repository a name and click the Create repository button.
Initialize the repository in your project directory by running git init, which then highlights all files that are not .gitignored.
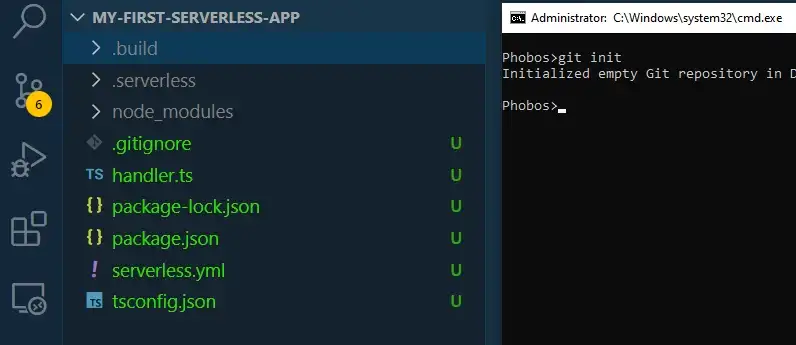
git init
git add .
git commit -m "initial commit"
git branch -M main
git remote add origin https://github.com/USERNAME/Your-Repository.git
git push -u origin main
Now our code should be deployed to Git.
Creating Deployment Pipeline
Remember the access key and secret we generated on the IAM page? We're going to use these keys and store them in our GitHub repository to authorize deployments to AWS.
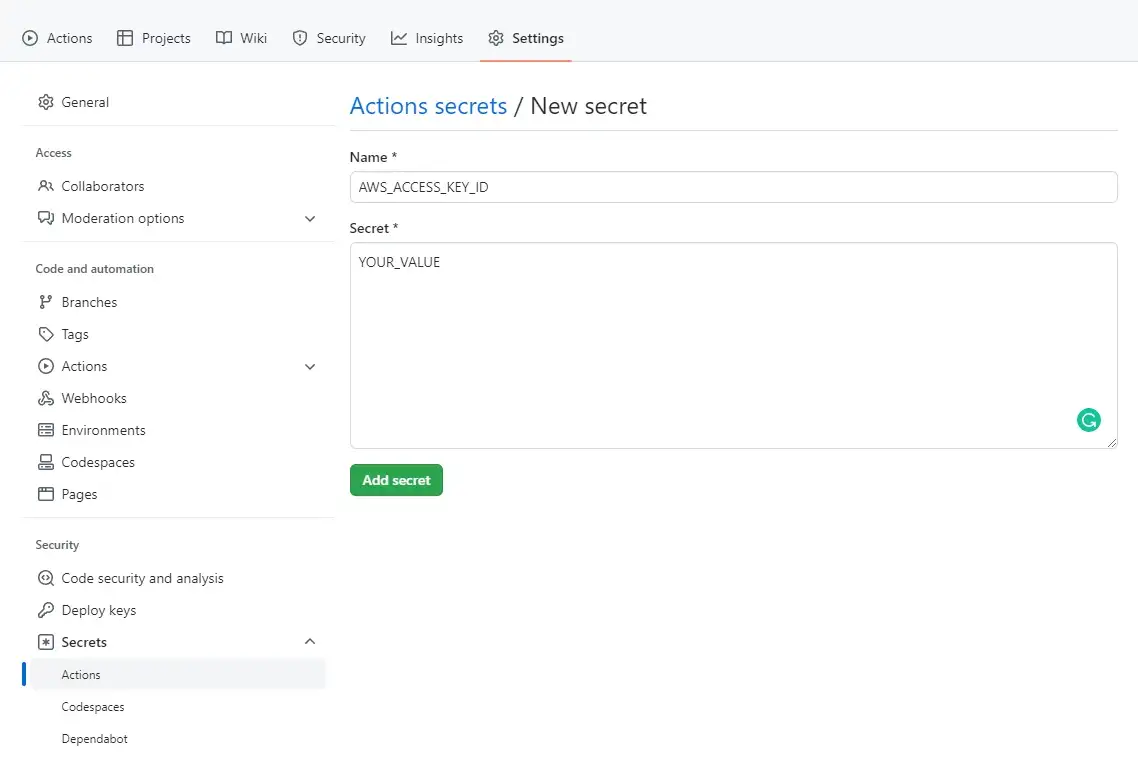
We start by adding secrets to our GitHub Repository. On the repository page, click on Settings in the top navigation, then on Secrets, Actions, then on the New repository secret button.
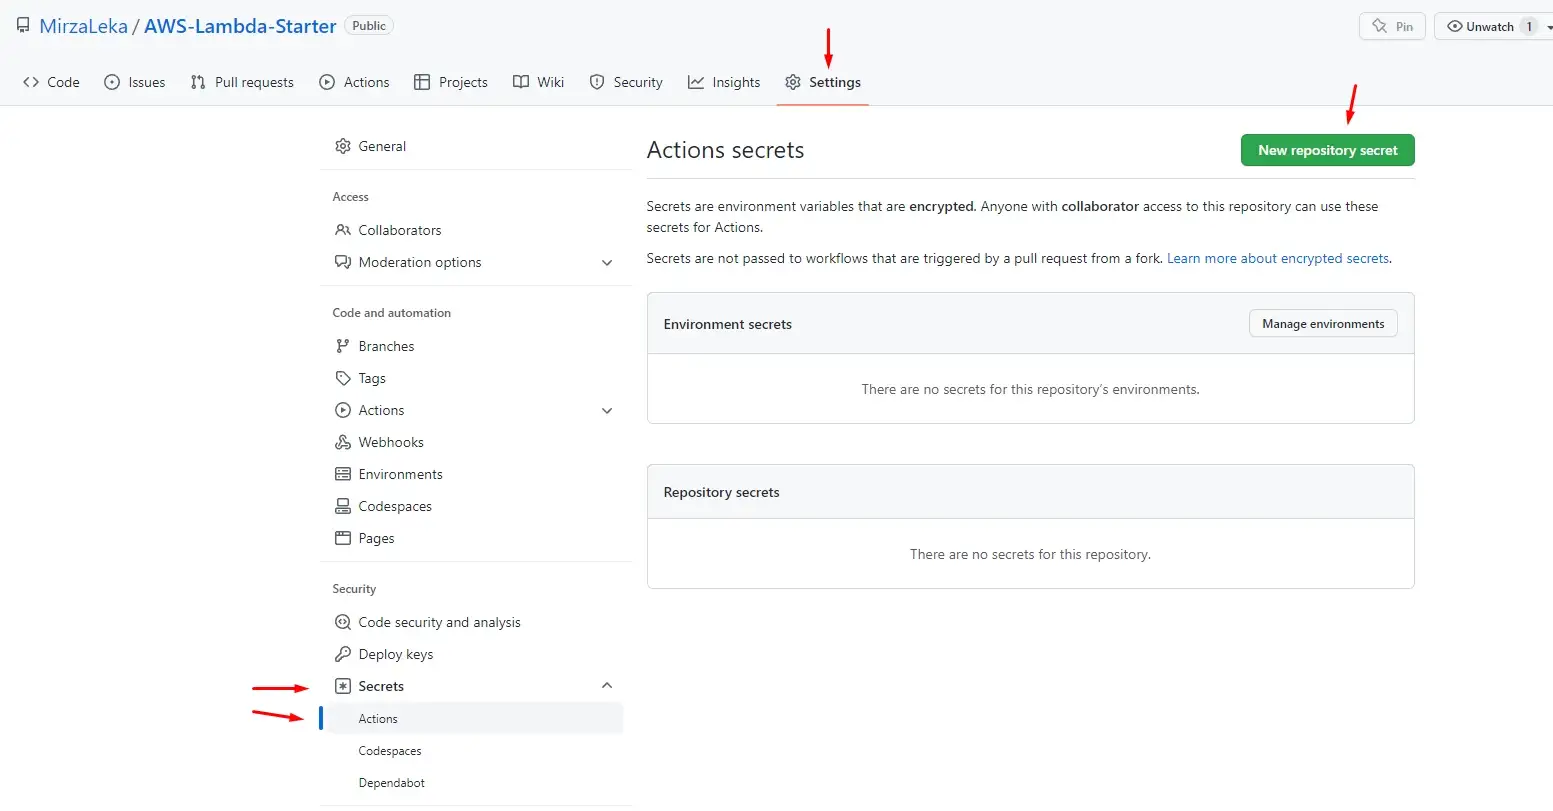
Then add each one by one.
Back in the code editor, in your root directory, create a .github directory, then a workflows directory inside, then a main.yml file (.github/workflows/main.yml).
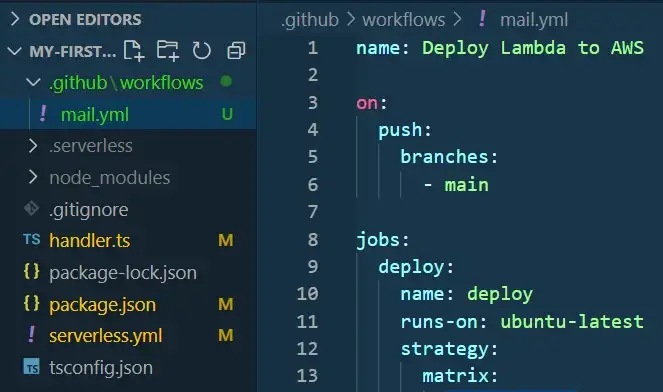
We can find an example of the main.yml file on the Serverless GitHub Actions page. It should look like this:
name: Deploy Lambda to AWS

on:
  push:
    branches:
      - main

jobs:
  deploy:
    name: deploy
    runs-on: ubuntu-latest
    strategy:
      matrix:
        node-version: [16.x]
    steps:
      - uses: actions/checkout@v3
      - name: Use Node.js ${{ matrix.node-version }}
        uses: actions/setup-node@v3
        with:
          node-version: ${{ matrix.node-version }}
      - run: npm ci  # install dependencies from package.json file
      - name: serverless deploy
        uses: serverless/github-action@v3.1
        with:
          args: deploy
        env:
          AWS_ACCESS_KEY_ID: ${{ secrets.AWS_ACCESS_KEY_ID }}
          AWS_SECRET_ACCESS_KEY: ${{ secrets.AWS_SECRET_ACCESS_KEY }}
Now we stage these changes and push them to Git:
git add .
git commit -m "Added Github deployment actions"
git push
Upon pushing we should see a new job running under the Actions tab in the GitHub repository.
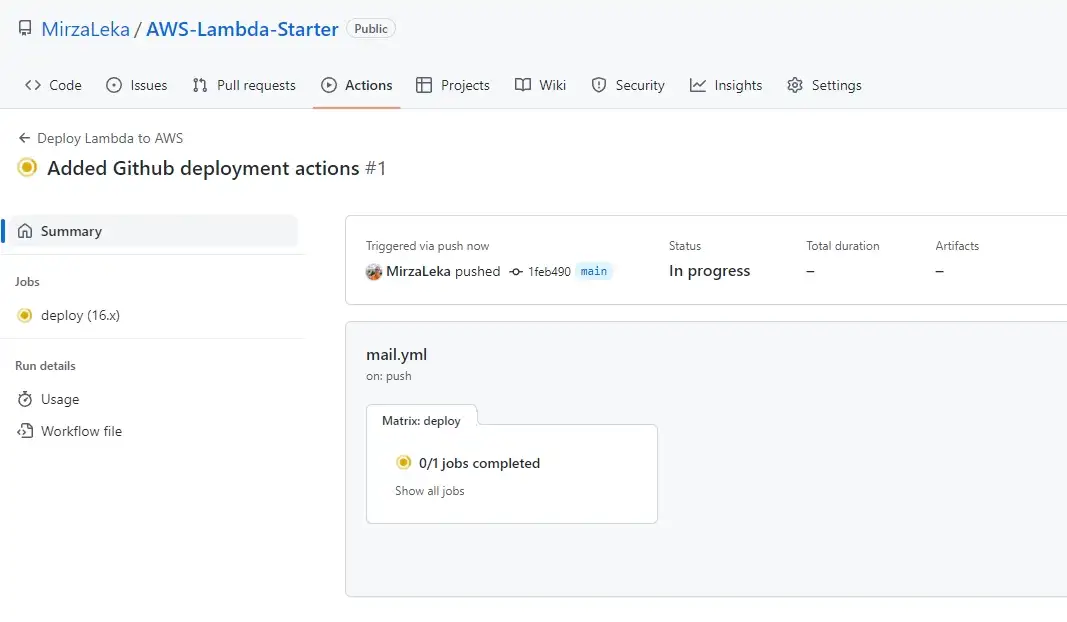
We can click on it to expand.
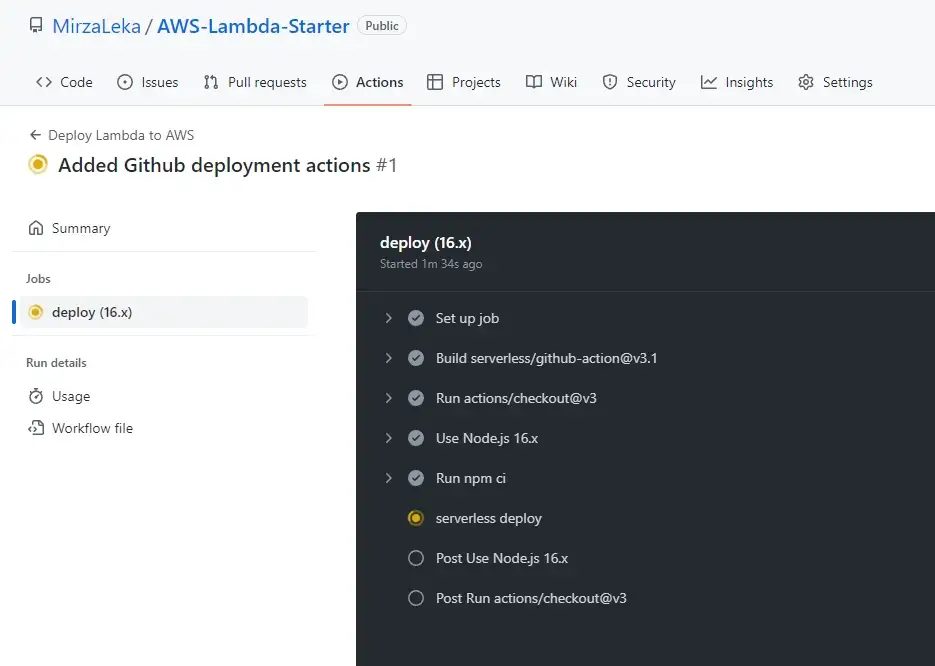
Once the deployment is completed, expand the serverless deploy section and take the two API endpoints:
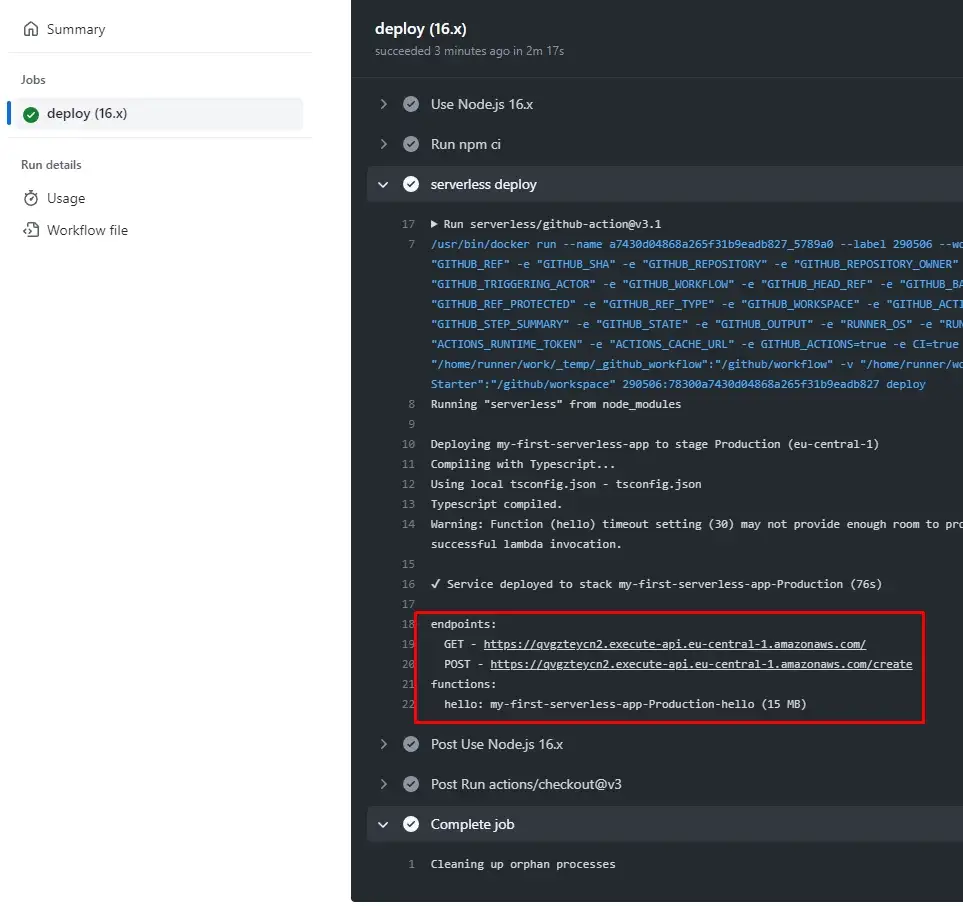
Let's test one of these in Postman to verify that it works.
Remove Lambda Function

To remove this function from AWS simply run:
$ sls remove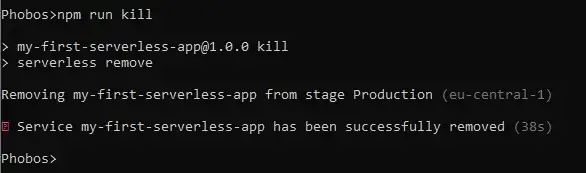
Make sure to run this command for each stage (dev, production, etc.). You can build a new function just by redeploying the existing one.
Notes on Lambda & Serverless Framework
- If we enter a command that is deprecated, Serverless Framework will display warnings in the terminal when deploying.
- If we enter an invalid command, the Framework will throw an error and will not deploy.
- Separating routes per function allows us to deploy only the function (part of the code) that has been changed.
- Debugging is hard because you can't SSH into the machine to see what went wrong. Logs are your best bet to find issues.
- Lambda functions are not recommended to be used with systems where persistence is of significance. Due to auto-scaling, we can never be certain which instance we're using, and with frequent Read & Write requests, there is a chance that the data will be inconsistent (Race Conditions).
More Serverless Goodies
Commands
# Authenticate with AWS
sls config credentials --provider aws --key access_key --secret secret

# Create Project
sls
sls create -t aws-nodejs -p my-app

# Deploy Project
sls deploy             # deploy whole project
sls deploy -f hello    # deploy just a specified function

# Local Testing (with Serverless-Offline installed and plugin set)
sls offline start      # starts the app on localhost:3000

# Remove Project
sls remove             # Remove the project from AWS
Toolkit: Visual Studio Code has a Serverless-IDE extension that helps write the serverless.yml files.
Monitoring: We've already seen how to monitor issues with CloudWatch and Serverless Console. Another great service is Dashbird, which gives you a pretty detailed overview of your Lambda functions and does frequent email alerts when something goes wrong.
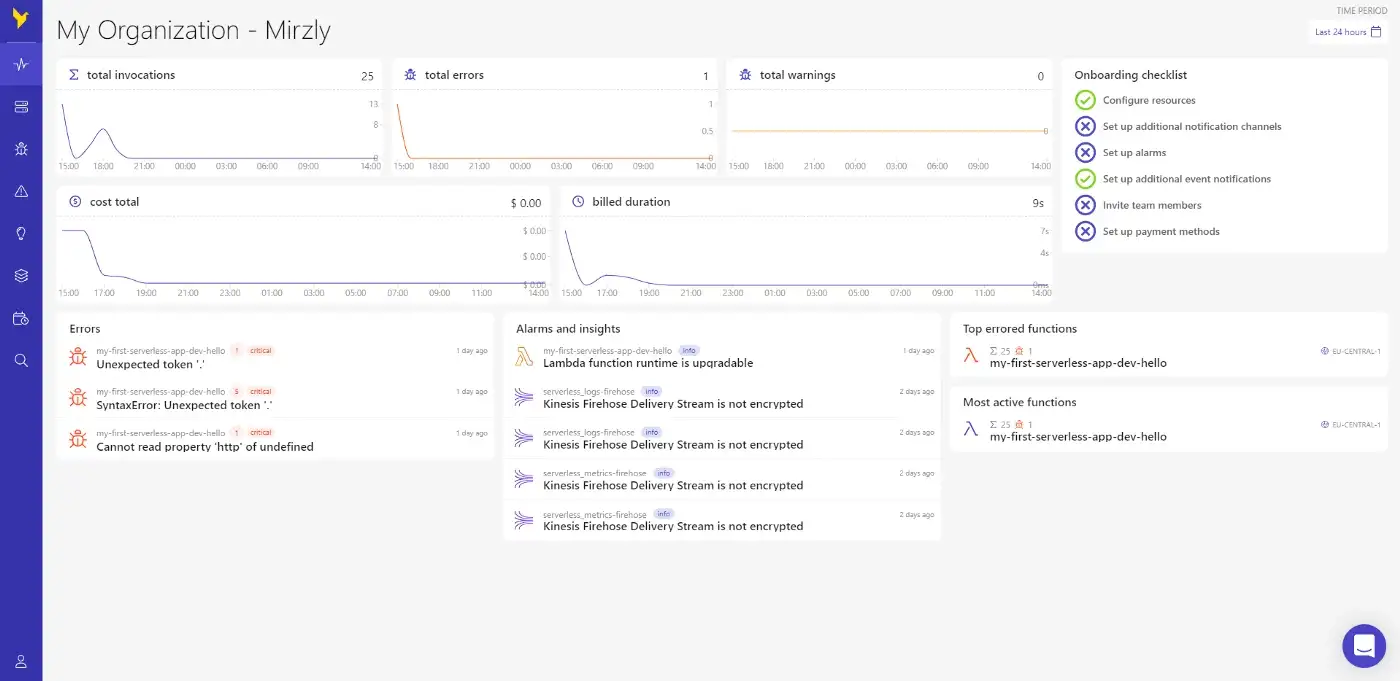
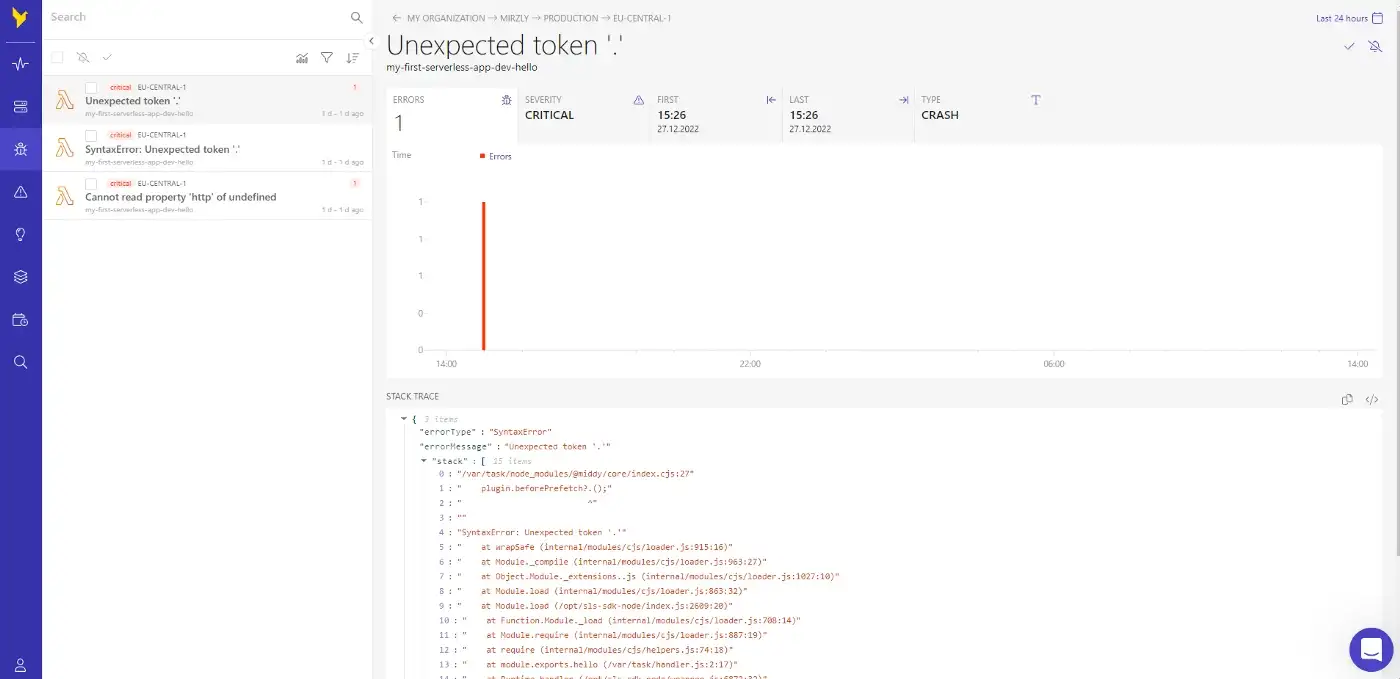
It's also pretty easy to set it up with your AWS account. Official Docs.
Learn More
This was just a small peek into the world of Serverless. I definitely encourage you to use AWS Lambda yourself and try the things that are on offer.
- AWS Lambda Docs
- Serverless Framework Docs
- Serverless Console
- Serverless Framework Forum
- Serverless Framework with AWS Lambda Crash Course
- Serverless Framework Youtube Playlist
- Serverless Framework on AWS Youtube
- Express.js app with Serverless
- Node.js Serverless TypeScript
You can find the whole code on my AWS-Lambda-Starter repository. Special thanks to my partner in crime Dzenan Dzafic.